Verified Boot Data Structures
Introduction
As the verified boot library has evolved to meet the needs of firmware, kernel boot, and security, we’ve discovered some parts of it can be made easier to work with. This document describes the refactoring of the verified boot library to address these issues.
Basic Guidelines
Structures are versioned
Versioning allows readers to check for older/newer structures. This feature lets us add fields to the structures without necessarily breaking old readers and provides an upgrade path for newer readers to handle old structures. Versioning structures will resolve the issue where kernel and firmware must be updated in unison. Structures have a major and minor version number.
- ReaderMajor != StructureMajor - fundamental change in struct; do not attempt to parse
- ReaderMinor == StructureMinor - all is well
- ReaderMinor < StructureMinor - reading a newer file; fields have been added to the struct, but the existing reader will be able to ignore them and still function
- ReaderMinor > StructureMinor - reading an older file; reader won’t find the fields added since version StructureMinor, and should use default values for those fields
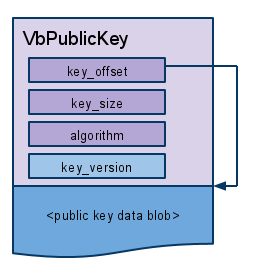
Key structures keep track of their own key version and algorithm
While public keys generally have some internal structure, it’s not always
apparent. We can use various sizes and algorithms for different keys, so we’ve
defined a **VbPublicKey** structure that simply encapsulates the public key
data along with its size and algorithm:
**VbSignature** structures are very similar, but instead of the algorithm and
version they only remember the length of data they signed. A signature data blob
is usually a hash that has been encrypted with a private key. The corresponding
public key must be used to extract the original hash. In some cases we may also
use a VbSignature structure for a nonencrypted hash.
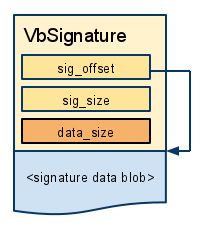
The public key and signature headers know how to find their data
Given a pointer to the VbPublicKey or VbSignature header, you can find the
corresponding data, which may not be immediately following the header itself.
This lets us put the header structs as sub-structs in the major structures
(preambles, etc.), followed by the data, without needing to pass in data
pointers separately.
Functions should take header pointers rather than raw data wherever possible.
Common structures are reused
Keys, signatures, and key blocks are used by firmware and kernel algorithms. Common code for generating and parsing is reused.
Major structures
Key block
At the beginning of a firmware or kernel image is a key block that contains the subkey used to sign the rest of the data in the image. The subkey itself is signed by some higher key, which is presumably more secure or robust.
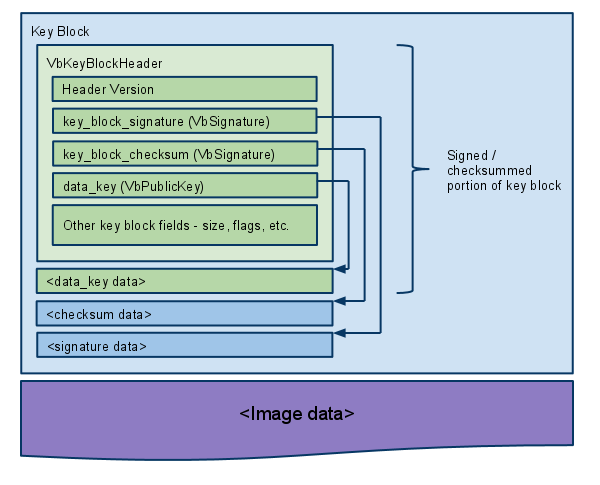
The key block itself is either signed (by Google) or simply checksummed (for self-signed developer images), so only one of the two VbSignatures is used to validate it. The reason we have two VbSignatures in the key block header is so that we can build one image that can be validated in either way, which makes testing and development much simpler. This key block structure is identical for firmware and kernel images, so the code to create and verify it can be shared.
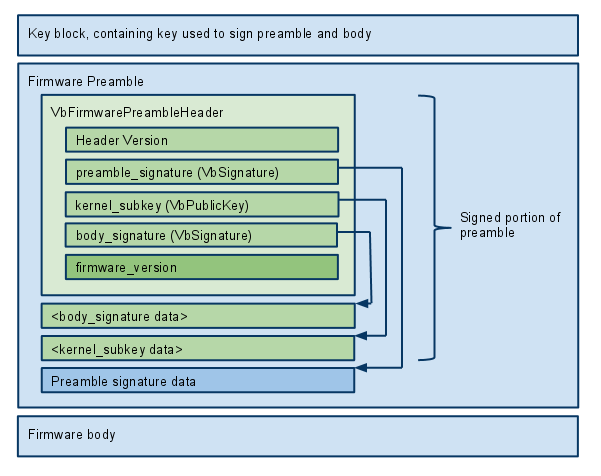
Firmware image
A firmware image consists of a key block, a firmware preamble, and the firmware body. The key block, preamble, and body do not directly point to each other, so they can be read into separate blocks of memory. The firmware preamble is signed by the key block, and contains the signature of the firmware body plus another subkey which will be used to validate the kernel image.
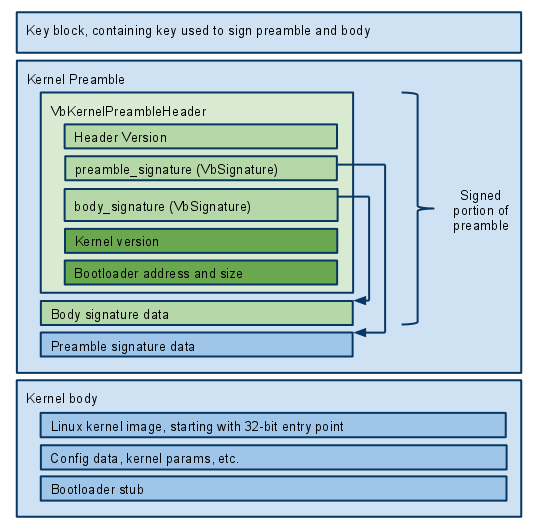
Kernel image
A kernel image consists of a key block, a kernel preamble, and the kernel body. The key block, preamble, and body do not directly point to each other, so they can be read into separate blocks of memory.
Root of trust
When the device is first powered on, it begins execution from a read-only section of flash memory. In addition to (hopefully) secure code, that read-only region contains the primary root keys needed to validate all the rest of the signed images. The structure that locates the root keys and various other read-only components is the GoogleBinaryBlockHeader, or “GBB”.
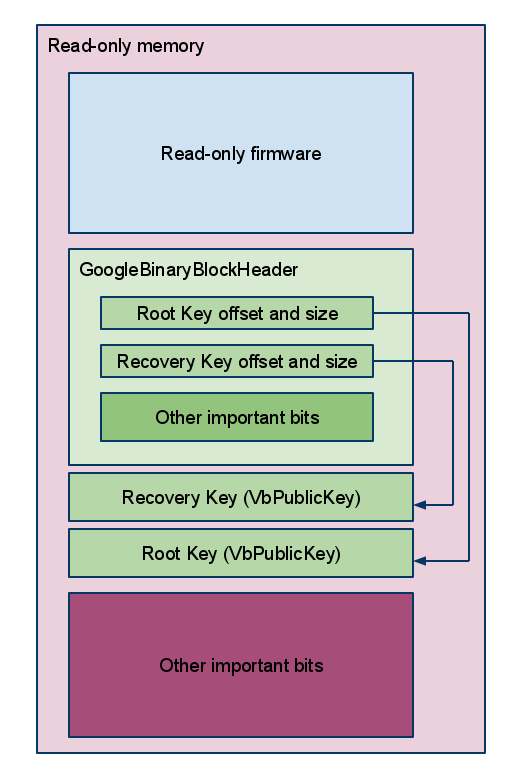
There are two primary keys in the GBB. The root key is used in the normal boot sequence to sign the read/write firmware, which contains subkeys to sign the kernel, and so forth. In recovery mode, only the read-only firmware is executed (because the read/write firmware may have been erased), so the kernel image on the removable drive is signed by the recovery key. There are a total of six separate keypairs involved in the complete boot process (see diagrams below):
Normal boot
- Read-only firmware looks in the GBB, finds the root key in read-only memory.
- The root key validates the read/write firmware’s keyblock, which contains the firmware data key.
- The firmware data key validates the firmware preamble (which contains the kernel subkey) and the read/write firmware body.
- The read/write firmware begins execution.
- The read/write firmware uses the kernel subkey to validate the kernel’s keyblock, which contains the kernel data key.
- The kernel data key validates the kernel preamble and the kernel blob.
- The kernel begins execution.
- The kernel image contains the hash of hashes, which is used to validate the bundle of hashes used by the block-based rootfs validation scheme.
- The filesystem driver uses the bundle of hashes to validate each block of the rootfs as is read off the disk.

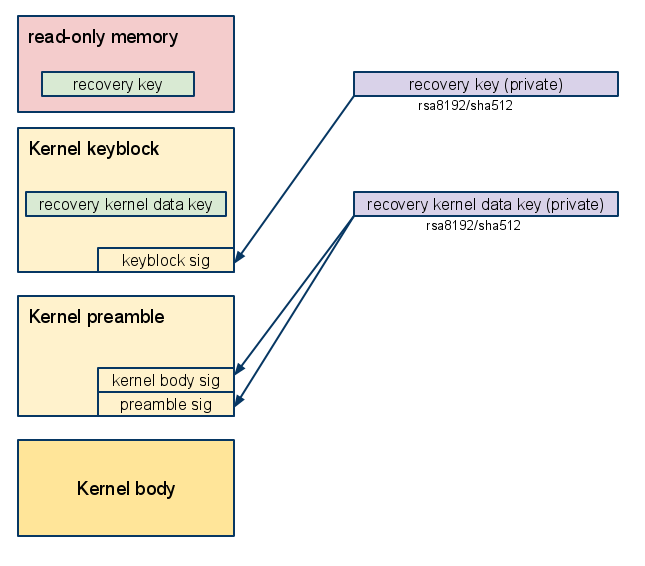
Recovery boot
- Read-only firmware looks in the GBB, finds the recovery key in read-only memory.
- The recovery key validates the kernel’s keyblock, which contains the recovery kernel data key. Although it serves the same purpose as the kernel subkey in normal boot, it uses a larger key because the read/write firmware is not used as an intermediate step.
- The recovery kernel data key validates the kernel preamble and the kernel blob.
- The kernel begins execution.
- The kernel image contains the hash of hashes, which is used to validate the bundle of hashes used by the block-based rootfs validation scheme.
- The filesystem driver uses the bundle of hashes to validate each block of the rootfs as it is read from the removable media.