Bluetooth Tast tests
Introduction
This guide will walk you through setting up a local Bluetooth testbed for running Bluetooth Tast tests locally, such as the automated end-to-end (E2E) Fast Pair Tast tests.
For an overview of Bluetooth automated tests in general, including what test suites and test frameworks are in use, check out the Connectivity EngProd docs and go/cros-conn-bluetooth-engprod-tast
Tast test results run in the lab can be viewed at go/stainless Bluetooth Tast test results are organized from Stainless at go/cros-bt-test-dashboards, where you can split by board/form factor/etc.
Running Tast tests
Check out the automated E2E test section to learn more about running Tast tests, including how to setup your local DUT, how to enter the chroot, and how to write good Tast tests.
Running Tast tests on lab machines
Check out the Crosfleet section to learn more about leasing lab machines for use. There are also helpful pointers within go/run-nearby-tast-tests for using crosfleet.
Only certain lab machines are equipped with Bluetooth-enabled Raspberry Pis ("bt peers") which are necessary for running most Bluetooth tests. To check for Bluetooth-enabled lab machines that are available to lease, check out the Swarming Bot List.
Useful pools running Bluetooth tests:
- label-pool:wificell_bt_* contains bots with 1 CB and several btpeers.
- label-pool:cross_device_multi_cb contains bots with 2 CBs, an Android phone, and a btpeer. These bots are required for several Fast Pair tests.
Tip: Different pools of lab machines have different capabilities, which are described here.
Running Autotest (Tauto) tests
If you need to run Bluetooth Autotest tests, you should probably consult their documentation instead: go/crosbt-autotest. There are no Cross Device features currently being tested on Autotest (although Fast Pair tests were on Autotest originally). However, the test bed setup is identical for Tast and Autotest.
Setting up a local Test Bed
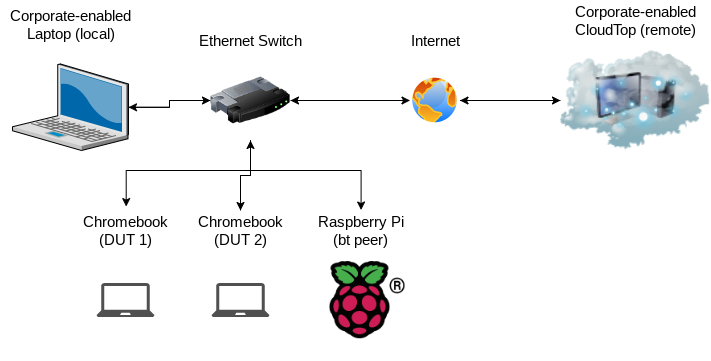 Figure 1:
A local Bluetooth testbed setup with 2 Chromebooks and 1 Bluetooth peer
Figure 1:
A local Bluetooth testbed setup with 2 Chromebooks and 1 Bluetooth peer
Hardware Requirements
You can acquire a Bluetooth-enabled Raspberry Pi from Amazon. Getting one of these starter kits is recommended, but at a minimum your Raspberry Pi must be equipped with:
- (Wired) Internet connection
- Bluetooth support
- USB ports (for first-time setup)
- SD card and SD card slot (for installing the OS)
You'll also need:
- A Windows/Mac with an SD card slot (or SD card reader)
- Screwdrivers (for optionally setting up the enclosure)
- Spare keyboard/mouse/HDMI cable (for first time set-up)
- An ethernet switch (highly recommended)
Setting up the Raspberry Pi
The following setup instructions are based on this AVL testbed setup guide.
Tip: To setup the enclosure (recommended), you'll probably want to follow some YouTube tutorials.
Follow the setup instructions on the official Raspberry Pi website to install the Rasperry Pi OS. The steps are summarized below. The imager software is not supported on ChromeOS, so use a Windows/Mac for these steps.
- Install the Raspberry Pi imager.
- Insert the Micro-SD card reader into your laptop.
- Select and write the Raspberry Pi OS Lite (Legacy) image onto the SD card.
- Write an empty
sshfile in the root of the SD card. Either runtouch sshin the root of the SD card, or open up a text editor and save a blank file titledssh. - Insert the SD card into the Raspberry Pi and boot.
- You may need a GUI to perform the setup wizard. Connect a mouse, keyboard, ethernet cable, and HDMI cord to the Raspberry Pi as if it was a regular computer (because it is!) and follow the prompts.
Note: The ssh file step is required for your Raspberry Pi to accept incoming SSH requests.
Tip: One of the simplest ways to determine the IP address of the Raspberry Pi is
to connect a display and run the command ifconfig.
Setting up SSH on the Raspberry Pi
At this point, you should have your Raspberry Pi and DUTs setup on the same
local network shown in Figure 1. You can setup your DUT using the
automated E2E test docs. I highly recommend using wired
(ethernet) connections between all of the devices on your local network since
those IP addresses tend to be more stable. You may need to purchase an ethernet
switch if your router doesn't have enough ports. You should also know the
Raspberry Pi's IP address, which you can find by running ifconfig on the
Pi, or inspecting the devices connected to your local network. We'll export the
IP address for ease of use.
export RASPBERRY_PI_IP=192.168.0.14
Note: Since the local testbed requires direct connections with low security, it is not recommended to set it up in the office. Theoretically, setup should be possible on a lab network or through direct connections.
First, make sure you can SSH into the Raspberry Pi. The default username is pi
and the default password is raspberry. You may have changed the password
during setup.
ssh pi@$RASPBERRY_PI_IP
Now, setup your Secure SSH to port-forward the Raspberry Pi IP address. In this image I've set up my port-forwarding with the following args:
- -R 2200: DUT_1_IP:22
- -R 2201: DUT_2_IP:22
- -R 3141: RASPBERRY_PI_IP:22
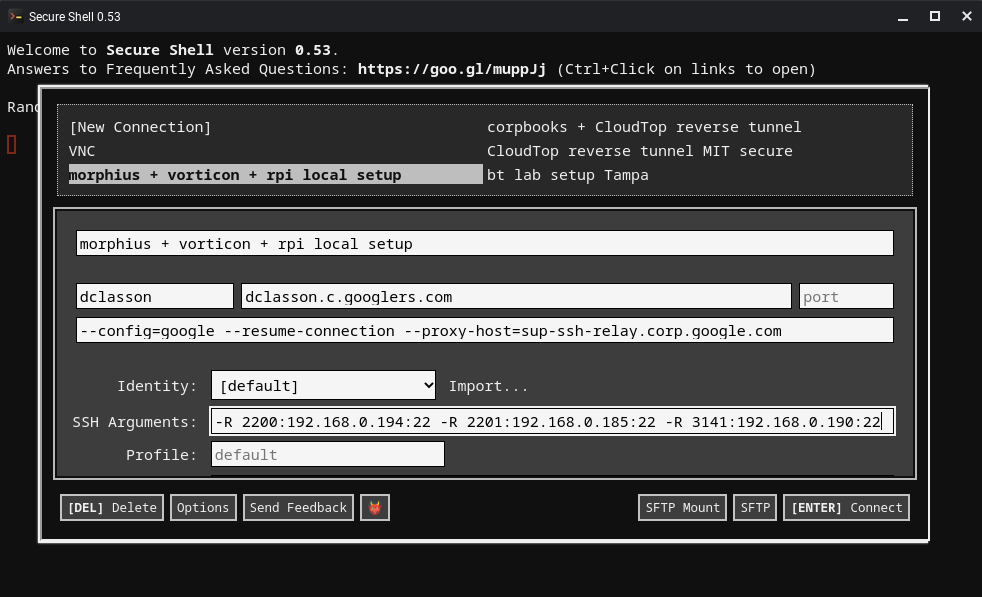 Figure 2: Secure SSH setup with DUT 1 on port 2200, DUT 2 on port 2201, and the bt peer on port 3141.
There is a helpful
script
to configure the SSH keys on your laptop and Raspberry Pi so that you can SSH
into the Pi without a password (which is necessary for running Tast tests).
However, this script is not possible for Cloudtop users since it only accepts IP
addresses of the form 192.168.0.1, not port-forwarded address like
localhost:3141.
For non-Cloudtop users, you can run the following command:
sh ~/chromiumos/src/platform/chameleon/utils/raspberrypi_setup $RASPBERRY_PI_IP raspberry
For Cloudtop users, we have to be a little bit more roundabout. Copy the
setup script
to your local machine into a new file like /tmp/setup_pi (don't worry, it's
just bash commands).
From the laptop:
sh /tmp/setup_host $RASPBERRY_PI_IP raspberry
Copy the setup script into the Raspberry Pi and run this line in the script manually:
scp /tmp/setup_pi pi@$RASPERRY_PI_IP:/tmp/
ssh pi@$RASPBERRY_PI_IP
sudo sh /tmp/setup_pi $RASPBERRY_PI_IP raspberry yes
At this point, you should be able to ssh into the permission user root with no
password from your laptop!
ssh root@$RASPBERRY_PI_IP
We still need to add the SSH keys to the Cloudtop. The easiest way to do this is through the script, however the script will fail early since it can't ping the Raspberry Pi's IP address (due to the port forwarding issue with the script).
Open up the
setup script
file in your local checkout of chromiumos, which at the time of writing is at
chromiumos/src/platform/chameleon/utils/raspberrypi_setup. You'll want to
modify it to ignore the ping commands (which will fail). Here's an example of my
modified version.
cd ~/chromiumos/src
sh platform/chameleon/utils/raspberrypi_setup localhost raspberry
You'll know you've completed this step if you see the file testing_rsa inside
of ls ~/.ssh.
Installing Chameleon daemon on the Raspberry Pi
Finally, we'll setup the Chameleon package on the Raspberry Pi. Note that repo sync can take a long time. If you encounter errors during this step, it's
likely that you didn't setup the SSH keys correctly on the Pi and on the
Cloudtop.
(outside) $ cd ~/chromiumos/src
(outside) $ repo sync
(outside) $ cros_sdk
(inside) $ setup_board --board arm-generic
(inside) $ cd ~/trunk/src/platform/chameleon
(inside) $ make PY_VERSION=python3
(inside) $ make remote-install CHAMELEON_HOST=localhost CHAMELEON_SSH_PORT=3141 CHAMELEON_USER=root
Tip: Remember to set CHAMELEON_SSH_PORT to the Raspberry Pi's port-forwarded SSH port, which we set to 3141 in SecureSSH.
This is also how you'll develop and make changes on Python services running on the Raspberry Pi, such as the Fast Pair GATT service.
# Make changes to code in ~/chromiumos/src/platform/chameleon

# You have to commit code changes before you can run "make"
(outside) $ git add .
(outside) $ git commit

(inside) $ make PY_VERSION=python3
(inside) $ make remote-install CHAMELEON_HOST=localhost CHAMELEON_SSH_PORT=3141 CHAMELEON_USER=root

# Test your changes by running Tast tests and observe the logs
# on your Raspberry Pi at /var/log/chameleon.
You can verify that Chameleon is installed correctly by SSHing into the Raspberry Pi and running:
sudo /etc/init.d/chameleond status
If you see the message chameleond is running, you're done!!! Check out the
AVL guide
for troubleshooting tips.
Running Bluetooth Tast tests locally
At this point, you should finally be ready to run Bluetooth Tast tests locally. This usually looks like the following:
(outside) $ cd ~/chromiumos/src
(outside) $ cros_sdk
(inside) $ cd ~/chromiumos/src/platform/tast-tests
(inside) $ tast run --var=bluetooth.BTPeers=localhost:3141 localhost:2200 bluetooth.FastPairInitialPair
Tip: localhost:3141 and localhost:2200 match the port forwarded arguments I set in SecureShell for the bt peer and DUT, respectively.