Pepper plugin implementation
This document provides a quick reference for PPAPI integration in Chromium.
If you're adding a new API, see Pepper API Best Practices for helpful guidelines and our process is documented in Pepper API Proposals.
Quick reference to important code locations
- ppapi — Root PPAPI code.
- api — IDL versions of the interfaces.
- c — Public C binary interface (generated by the IDL, checked into the tree)
- cpp — Convenience C++ wrapper around the C interface.
- generators — the IDL-to-C compiler
- host — code used in content and chrome to implement the backends for the various resources.
- native_client — The NaCl trusted plugin
- proxy — Chrome IPC-based proxy
- tests — Source code for the unit tests.
- shared_impl — Contains implementations for Pepper objects that we want to share between the proxied (ppapi/proxy) and the in-process version (content/renderer/pepper).
- thunk — Converts the C PPAPI calls from the plugin into C++ for the browser implementation.
- chrome/browser/renderer_host/pepper/pepper_*_host.* — Backend ("host") implementations of new-style resources in the Chrome browser process.
- chrome/renderer/pepper/pepper_*_host.* — Backend ("host") implementations of new-style resources in the Chrome renderer process.
- content/renderer/pepper/ppb_*_impl.* — Implementation of the old-style in-process resources and their connection to WebKit.
- content/browser/renderer_host/pepper/pepper_*_host.* — Backend ("host") implementations of new-style resources in the Content browser process.
- content/renderer/pepper/pepper_*_host.* — Backend ("host") implementations of new-style resources in Content renderer process
- content/renderer/pepper/pepper_plugin_delegate_impl.* — Delegate interface used to talk to the browser from the WebKit code.
- content/renderer/render_view.cc — Allocates the plugins (see createPlugin).
- chrome/test/ppapi/ — Code to run the tests as part of the Chrome browser tests.
Issue tracking
We're tracking PPAPI bugs in the Chromium issue tracker to keep things simpler. To file a pepper-related bug, use all of the following labels:
- Area-Internals
- Cr-Internals-Plugins-Pepper
If the bug relates to a Native Client specific part, additionally use the label:
- NaCl
See the current open bugs under the "Cr-Internals-Plugins-Pepper" label.
Running a plugin in Chrome
There are two modes of operation, "trusted" and "untrusted" plugins. Untrusted plugins use the Native Client to safely run code from the web and is cross-platform. Trusted plugins are loaded directly in either the renderer process or a separate plugin process as platform-specific libraries.
You run a plugin in trusted mode by building a platform-specific library implementing the API. For random manual testing, you can use one of the examples, the graphics 2D "paint manager" example is a good one for general hacking (see ppapi/examples/2d/). A trusted plugin is instantiated by registering it to handle a MIME type on the command line. Provide the full plugin name (which varies by platform), followed by a semicolon, followed by the MIME type. The MIME type should match the "type" attribute of the object tag specified on your page. For the paint manager example plugin on Linux, you would run:
chrome --register-pepper-plugins="/local/src/out/Debug/lib/libppapi_example_paint_manager.so;application/x-ppapi-example-2d" file:///local/src/ppapi/examples/2d/2d.html
In this case, application/x-ppapi-example-2d is what is specified in the example.html page. This can be anything you want, as long as the two types match. Note also that we specify --ppapi-out-of-process. In-process mode is being deprecated so it's a good idea to use this in general.
On Linux, you can automatically launch this process in a new GDB instance in a new xterm, which will help you in debugging startup problems. Use this command line switch:
--ppapi-plugin-launcher='xterm -title plugin -e gdb --eval-command=run --args'
"Old" resource and proxy design
Most resources are currently implemented using the old proxy design. There are several layers, and each resource is implemented once for in-process and once for out-of-process.
The in-process implementations are in content/renderer/pepper/ppb_*_impl.* These integrate with the rest of Chrome by using blink or other parts of content/renderer.
The proxy implements interfaces for the out-of-process case. They are implemented in ppapi/proxy/ppb_*_proxy.* The proxy has a ppapi/proxy/dispatcher.h on each end of the IPC channel. The specialization PluginDispatcher is on the plugin side, and the specialization HostDispatcher is on the renderer side. Each interface has a Proxy object for which there is one per dispatcher, and a resource object that corresponds to the PP_Resource object.
Some proxy objects and implementations share some or all of their code. Shared code can be put into ppapi/shared_impl/ppb_*_shared.* to avoid duplication.
Life cycle of a plugin -> renderer call:
- Plugin calls PPAPI function.
- Thunk layer converts this to a C++ call on a resource object.
- Resource object sends IPC message to renderer via the PluginDispatcher.
- The HostDispatcher receives message and forwards it to the appropriate interface proxy object in the renderer.
- Interface proxy converts IPC message back to a PPAPI call and issues it to the in-process implementation.
- Resource "impl" gets call and performs action.
Unlike the "new" design there is no standard way of communicating with the browser. Some components (TCP/UDP sockets) do this with hand-rolled tracking.
"New" resource and proxy design
All additions should use the new proxy design. It is higher performance and involves writing much less code. The new and old designs exist in parallel and we're moving resources over one-by-one.
The resource object is implemented once (in ppapi/proxy/*_resource.cc). This resource sends IPC to a "host" object in the browser and/or renderer process to do its work. The host object does not speak the Pepper API, it just uses Chrome IPC types. It can be in the renderer process, the browser process, or potentially both or neither (if all functionality is contained in the plugin process). It can also be implemented in the chrome or the content modules.
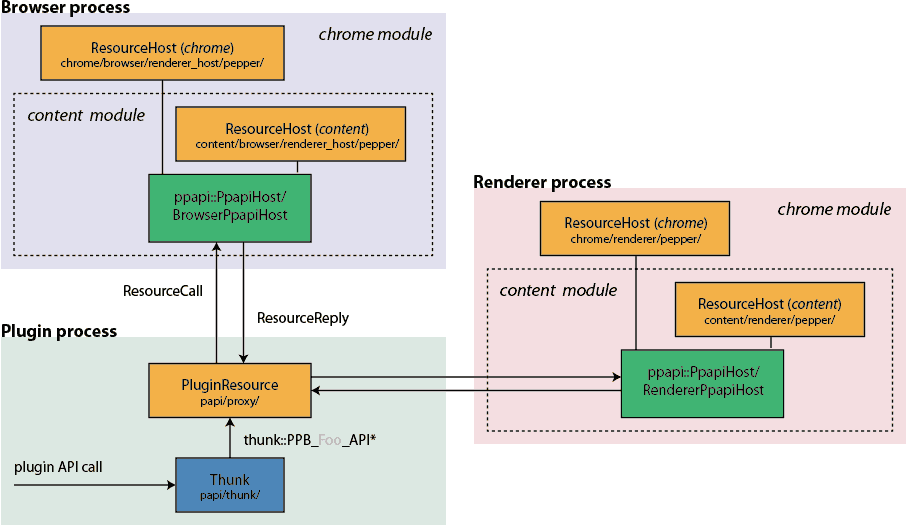
Where does your host object live?
- content/renderer/pepper/ — Probably the most common location. Most resources that interact with blink or other renderer functionality will go here.
- chrome/renderer/pepper/ — Use for Chrome-only interfaces (Flash, PDF, other custom stuff for custom Google plugins).
- content/browser/renderer_host/pepper/ — Use instead of or in addition to content/renderer/pepper when your resource needs to talk to the browser process for some reason.
- chrome/browser/renderer_host/pepper/ — Use instead of or in addition to chrome/renderer/pepper when your resource needs to talk to the browser process for some reason.
Each of the above directories has a "host factory" file in it for creating the hosts for your resource. You'll also have access to the BrowserPpapiHost / RendererPpapiHost which will allow you to make calls into the system and get context for your resource.
We support in-process mode for legacy interfaces needed by certain plugins. New resources do not need to support in-process. For resources that need in-process, we have a "fake" IPC channel that allows the "proxy" and "host" to be in the same process. To wire this up, first get your out-of-process implementation working, then hook up creation through content/renderer/pepper/pepper_in_process_resource_creation.cc. Note that this only works for resources implemented in content/renderer. Other types of hosts are not supported in in-process mode.
Life cycle of a plugin -> renderer call
- Plugin calls PPAPI function.
- Thunk layer converts this to a C++ call on the proxy resource object.
- Proxy resource does a CallRenderer with its message. This gets embedded into a "resource call" IPC message which encodes the resource ID and instance.
- The ResourceHost in the renderer receives the message and finds the corresponding resource host object.
- The resource host decodes the message and performs the operation.
Note that creation is a separate step. The resource creates the host in the browser or renderer by calling SendCreateToBrowser or SendCreateToRenderer. This is picked up by the host factory in the directory holding the resource.
Adding a new interface
Please look at our Pepper API Process Doc before starting to implement a new API.
To make the interface definitions (this is the same between the "new" and "old" proxy designs):
- **Create the IDL file.Most new interfaces will be dev so would be called ppapi/api/dev/ppb_foo_dev.idl.
- Generate the C interface file. Run the script ppapi/generators/generator.py. Make sure to run it from within the generators directory. This should make a corresponding ppapi/c/dev/ppb_foo_dev.h file which you should add to your CL.
- Write a C++ wrapper for your interface. (Some classes may not need C++ wrappers, check with Brett if you're unsure.) The corresponding location would be in ppapi/cpp/foo_dev.h. This is pretty easy and you should be able to copy the surrounding classes. Add it to the .gyp file.
- Add your new interface file to the C test list in ppapi/tests/all_c_includes.h. This is how we make sure that everything continues to compile in C (rather than just C++ mode).
To hook up your interface (this is the same between the "new" and "old" proxy designs):
- Write a C++ "API" for it. This is in ppapi/thunk/ppb_foo_api.h. This defines the virtual interface that Chrome will use to implement your interface. If your interface is a bunch of functions rather than a new resource, you can just add it on to ppb_instance_api.h. Check with Brett if you're unsure. Add a creation function for your resource to ResourceCreationAPI.
- Write a thunk for it. This converts the C PPAPI calls for your interface to C++ calls on the API you made in the previous step. Look at a similar interface to see what it does. Typically the Create function on a resource API would go through the ResourceCreationAPI object (add a function there for your new resource type) and the rest of the functions go through to your API. Add the thunk and API to ./ppapi/ppapi_shared.gypi.
- Register the interface with Chrome. Add it to ppapi/thunk/interfaces_ppb_public_dev.h. Follow the directions in the _stable version of that file. This tells Chrome about your interface name and connects your thunk function to it. This file is included in various places that define implementations of the macros to register the name->vtable mapping.
Implement the resource "proxy" (this is different from the "old" design):
- Create the proxy file. This is called FooResource as opposed to "old" design resources which would be PPB_Foo_Proxy.
- Define the IPC messages you need. Add them to ppapi/proxy/ppapi_messages.h. You'll generally need one for creating your host resource, one for each "call" from the proxy to the host, and one for each "reply".
- Write a unit test in the same directory. This should just emulate the IPC layer. Be sure to test different edge conditions and make sure that the proper IPC messages are sent in response to plugin calls, and that the correct plugin callbacks are called in response to IPC messages.
Implement the resource "host" (this is different from the "old" design):
- Write the resource host. Put the file in one of the four locations discussed above.
- Hook up the host creation. The host factory in the same directory as your resource host should have a switch in it. Be sure to check the permissions if your interface is dev/trusted/etc. to make sure the plugin is allowed to create such resources.
- Implement the IPC message handlers. You should be able to copy how an existing resource host works to get the calls you expect.
- Keep in mind that the plugin is untrusted. It could be trying to exploit you. Don't trust that it has permission to do anything, and rigorously check all parameters.
Designing your interface
Features are implemented as "interfaces." An interface is just a vtable identified by a string name. Most features are implemented as "resources" which are generic refcounted project identified by an opaque handle. Your normally have an interface that exposes all the functions your resource supports.
-
The first two functions in a resource's interface should be PP_Resource Create(PP_Instance, ...) to allow creation of your resource and PP_Bool IsFoo(PP_Resource) to allow for type checking.
-
Since most stuff happens out-of-process, these functions should be asynchronous. Asynchronous functions should take a PP_CompletionCallback argument and return an int32_t (which will normally be PP_OK_COMPLETIONPENDING for asynchronous completion). It's important that your create function not be asynchronous because then the caller has no way to cancel the callback (normally you can just delete the object). If you object constuction requires asynchronous completion, have a simple synchronous Create function and then an asynchronous Open or Init function which you would call after creation.
-
Many completion callbacks want to return data. These should be of the form: int32_t DoFoo(PP_Resource resource, PP_Var* output_arg, PP_CompletionCallback cb); Your C++ wrapper can then take a CompletionCallbackWithOutput<Var> which has template magic to convert the output argument to a parameter on the callback function.
Writing error logs
In a resource implementation, use Resource.Log() to display a message in the console (in the JS inspector) for the page. In other places, use PpapiGlobals::LogWithSource().
- Log messages should have the name of the interface, a dot, and the function name, followed by a colon and the text of the message. The rest of the message should begin with a capital and end with a period as with Chrome comments. So: "PPB_Foo.Frobulate: The bar is invalid.".
- Not all errors should have error logs. In fact, most shouldn't. Most functions should have well-defined error conditions that are described in the documentation for that function. In this case, it's unnecessary to log an error because the caller can easily see they got a NOACCESS and look up what that means in the context of your function, for example.
- Some things may be tricky or easily called incorrectly, may have no return value, or ambiguous return values. In these cases, it can be useful to add a Log call to tell the programmer how they messed up.
Architecture of the renderer implementation
It may help to open the NPAPI plugin architecture design doc in another tab. This section will compare Pepper to the "in process" NPAPI implementation. Most of the names are the same between Pepper and NPAPI, except we use the webkit::ppapi namespace and NPAPI uses the webkit::npapi namespace. If you haven't already, you should also understand the important concepts of PPAPI.
-
To WebKit, a Pepper plugin is the same as an NPAPI plugin. We implement the WebKit::WebPlugin interface as webkit::ppapi::WebPluginImpl in ppapi_webplugin_impl.cc. This is our analog of NPAPI's webkit::npapi::WebPluginImpl.
-
The PluginInstance object talks to the plugin's PPP_Instance interface, and receives requests through the browser's PPB_Instance interface.
-
The PluginInstance owns a reference to the PluginModule which represents the shared library loaded in the renderer. The PluginModule is shared between all instances of that plugin. It handles loading and unloading of the library, implements the PPB_Core interface, and also implements the GetInterface function that the plugin module uses to get all other browser interfaces.
-
In some cases, the plugin needs to talk "up" the browser stack. For example, a certain operation might require that the browser process do something on behalf of the plugin. To support this, there is the webkit::ppapi::PluginDelegate virtual interface.
-
The RenderView handles creation of the Pepper plugin in RenderView::createPlugin. RenderView has as a member a helper class PepperPluginDelegateImpl which implements the webkit::ppapi::PluginDelegate interface. This implementation is supplied to a plugin when it is created.
Debugging a plugin
Trusted plugins are loaded directly into the renderer sub-process, rather than a separate plugin process. You can use the standard renderer debugging techniques, including single process mode, for debugging the plugin.
Plugins also run in the renderer sandbox. You will find your plugin code is constrained to the same requirements and limitations as other code in the renderer (can't read and write files or directly access devices).
Running the tests
The tests in ppapi/tests are run as part of the Chrome browser_tests. The source code is in chrome/test/ppapi and you can see in that file there are separate GTest tests for each PPAPI test file. To just run this test, you can use:
browser_tests --gtest_filter="PPAPITest.*"
Or to run tests out of process:
browser_tests --gtest_filter="OutOfProcessPPAPITest.*"
You can also run the tests manually in Chrome. You first need to build the test plugin, which is the ppapi_tests project, and build Chrome (PPAPI doesn't work in test shell). When running Chrome, enable the PPAPI testing interface (it's off by default to prevent production plugins from abusing this API) and register the test plugin as handling the application/x-ppapi-tests MIME type:
chrome --register-pepper-plugins="C:\code\src\chrome\Debug\ppapi_tests.dll#PPAPI Tests##1.2.3;application/x-ppapi-tests" --enable-pepper-testing
The library name is platform-specific. On Linux, use libppapi_tests.so in the output directory. On Mac, use ppapi_tests.plugin. Once Chrome is running, just load the test_case.html file in the browser. Set the "query" part of the URL to be the name of the test you want to run, for example to run the ImageData tests, load:
file:///C:/code/src/ppapi/tests/test_case.html?ImageData
You will see a log of the test cases in the gray square. If the plugin doesn't load, you will see an error message above the gray square indicating that the plugin could not be found. This means that the library name is incorrect or it failed to load for some reason.
Running HTTP tests manually
Some tests like the URLLoader test require that it be run over HTTP. The Chrome browser tests are configured to automatically do this. But for debugging purposes you may want to do this manually. From your src directory on Linux, do:
export PYTHONPATH=third_party/pyftpdlib/src:third_party/tlslite:third_party/pywebsocket/src
python net/tools/testserver/testserver.py --port=1337 --data-dir=ppapi/tests
and on Windows, use:
set PYTHONPATH=third_party\pyftpdlib\src;third_party\tlslite;third_party\pywebsocket\src
python net\tools\testserver\testserver.py --port=1337 --data-dir=ppapi/tests
Then you should be able to load http://127.0.0.1:1337/files/test_case.html in your browser.
Running NaCl tests manually
The NaCl tests also must be run over HTTP, but they are loaded from the build output directory instead of ppapi/tests. So to start the test server for NaCl tests on Linux for a Debug build, do:
export PYTHONPATH=third_party/pyftpdlib/src:third_party/tlslite:third_party/pywebsocket/src
python net/tools/testserver/testserver.py --port=1337 --data-dir=out/Debug
and on Windows, use:
set PYTHONPATH=third_party\pyftpdlib\src;third_party\tlslite;third_party\pywebsocket\src python net\tools\testserver\testserver.py --port=1337 --data-dir=out/Debug
The command-line for running NaCl tests is different; you don't need to load the test plugin, but you do need to enable NaCl:
chrome --enable-nacl --enable-pepper-testing
You must append "&mode=nacl_glibc" or "&mode=nacl_newlib" to the URL. E.g.: load http://127.0.0.1:1337/files/test_case.html?testcase=URLLoader&mode=nacl_glibc in your browser.
Testing with Flash
Running a local build with Flash is slightly different. You can usually run a local build of Chromium with a Flash plugin that comes with a recent Chrome distribution (for example, Canary or Dev Channel) using --ppapi-flash-path and --ppapi-flash-version (gotten from the "Manifest.json" file that is bundled alongside the Flash plugin in Chrome. For example, on Linux you could type:
out/Debug/chrome --ppapi-flash-path=/opt/google/chrome-unstable/PepperFlash/libpepflashplayer.so --ppapi-flash-version=`grep -i version /opt/google/chrome-unstable/PepperFlash/manifest.json | awk '{print $2}' | awk -F"\"" '{print $2}'`
Instead of specifying the matching flash version you can specify 99.99.99.99, like this: --ppapi-flash-version=99.99.99.99. This gives a possible command line for Windows of this:
out\release_component\chrome.exe --ppapi-flash-path="%localappdata%\Google\Chrome SxS\User Data\PepperFlash\25.0.0.119\pepflashplayer.dll" --ppapi-flash-version=99.99.99.99
There are no specific gn args needed to run flash in a local build - non-official, component, and debug/release builds all work fine.
Make sure that the bitness (32-bit versus 64-bit) of your local build matches that of the DLL that you specify.
To test fullscreen flash, you may use https://www.permadi.com/tutorial/flash9FullScreen/index.html