Samsung Series 5 550 Chromebook and Series 3 Chromebox
Introduction
This page contains information about the Series 5 550 Chromebook and the Series 3 Chromebox that is interesting and/or useful to software developers. For general information about getting started with developing on ChromiumOS (the open-source version of the software on ChromeOS devices), see the ChromiumOS Developer Guide.
Developer Mode
Caution: Modifications you make to the system are not supported by Google, may cause hardware, software or security issues and may void warranty.
Introduction
Enabling Developer mode is the first step to tinkering with your Chromebook. With Developer mode enabled you can do things like poke around on a command shell (as root if you want), install ChromiumOS, or try other OS's. Note that Developer mode turns off some security features like verified boot and disabling the shell access. If you want to browse in a safer, more secure way, leave Developer mode turned OFF. Note: Switching between Developer and Normal (non-developer) modes will remove user accounts and their associated information from your Chromebook.
Entering
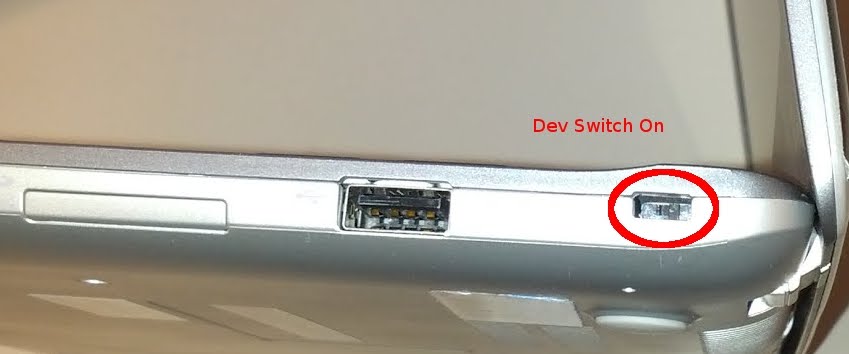
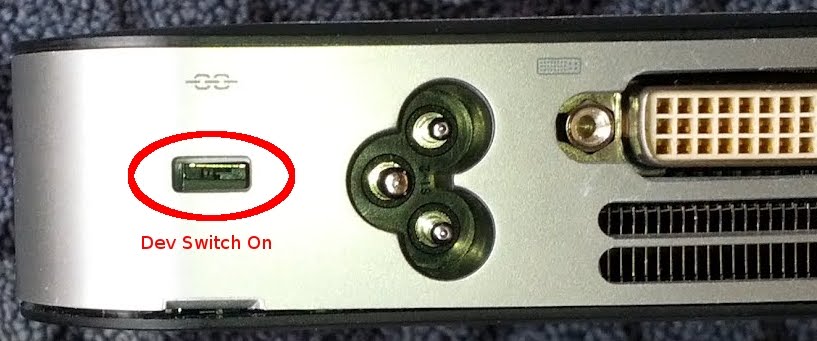
The developer switch enables the command line shell and deactivates part of the verified boot process. The switch on both devices is located inside the Kensington lock hole, and can be operated with a small paperclip (be gentle). To enable developer mode, simply move the switch and reboot.
The first time you reboot after turning the developer switch on, your chromebook will:
- Show a scary warning that its software cannot be trusted (press Ctrl-D or wait 30 seconds to dismiss).
- Erase all personal data on the "stateful partition" (i.e., user accounts and settings - no worries, though, since all data is in the cloud!).
- Make you wait between 5 and 10 minutes while it erases the data.
The erase and wait steps only happen when you first enable the developer switch, to help prevent someone from quickly reimaging your device while you're away from the keyboard. Successive boots will:
- Show the same scary warning (press Ctrl-D or wait 30 seconds to dismiss).
- Boot from any self-signed image on its SSD, negating the security of verified boot.
What's going on here?
Verified boot is the process by which ChromeOS ensures that you are running only the software that shipped with your device. The process starts with the read-only BIOS, which is built into the device at the factory and can't be modified without disassembly (please don't try that; you'll void your warranty). The read-only BIOS verifies one of two read-write BIOSes (there are two so we can provide updates if we have to with less risk of failure) and continues execution there. The read-write BIOS then verifies one of two (same reason) kernels and executes that, and the kernel verifies its root filesystem as each block is read off the SSD.
In Normal mode, the read-write BIOSes will only boot Google-signed kernels, and only from the SSD. In Developer mode, the BIOS allows any self-consistent kernel to boot. The BIOS displays the scary boot screen at each boot so that you will be aware that this is happening.
USB Boot
By default, USB booting is disabled. Once you are in Dev-mode and have a root shell, you can run:
# You only need to run this command once per system.
chromeos-firmwareupdate --mode=todev
sudo crossystem dev_boot_usb=1
and reboot once to boot from USB drives with Ctrl-U.
Legacy Boot
Sorry, but this device does not support a legacy BIOS mode. It predates the launch of that feature and it is not feasible to produce updates of devices in the field.
Leaving
To leave developer mode, simply flip the developer-mode switch back to the OFF position and reboot. One of two things will happen. If your Chromebook or Chromebox still has a valid read-write BIOS, Google-signed kernel, and an unmodified ChromeOS root filesystem, then that's what will boot and you'll be back running the official ChromeOS image. Or, if you've modified any part of the verified boot chain so that a full verified boot process isn't possible, you'll be dropped into recovery mode. That will require you to create a bootable USB key to restore your chromebook to its fresh-from-the-factory state. That's annoying, but not dangerous. As long as you haven't taken the device apart, you shouldn't be able to permanently break anything.
In either case, all personal information will be wiped from the device during the transition.
How to boot your own image from USB
- Build a ChromeOS image using the steps in the ChromiumOS Developer Guide. It does not need to be a recovery image.
- Turn on the developer switch and reboot to enter developer mode.
- If this is your first time to run developer mode, remember to type
chromeos-firmwareupdate --mode=todev - At a root shell, run
crossystem dev_boot_usb=1, and power off. - Insert the removable drive containing your image into a USB slot.
- Power on, and when you see the blue scary boot screen, press Ctrl-U.
- It should boot your image. If for some reason it doesn't think your image is valid it will just beep once instead.
How to install your own ChromiumOS image on your SSD
If you follow the full instructions from the ChromiumOS Developer Guide, you will eventually end up with a bootable USB drive containing your image. You can boot that image directly from the USB drive as described above. Since it's your personal image, it should have shell access enabled. Log in as user "chronos" and run
/usr/sbin/chromeos-install
That will wipe the SSD and install your image on it instead. When you reboot, it should attempt to boot your version. You'll still continue to see the scary boot screen at every boot as long as you are in developer mode, so you'll need to press Ctrl-D or wait 30 seconds to boot each time.
How to use the Recovery Mode button
Recovery mode is a special boot operation in which the BIOS will:
- Refuse to boot from the SSD
- Prompt you to insert a recovery USB drive
- Only boot a Google-signed image from the USB drive
You will encounter recovery mode when the BIOS is unable to find a valid kernel to boot, either because the SSD has become corrupted or (more likely) because you modified all the kernel partitions while in developer mode and have switched back to normal mode. While in developer mode, you will be presented with the scary boot screen at every boot. Pressing SPACE or RETURN will take you to recovery mode.
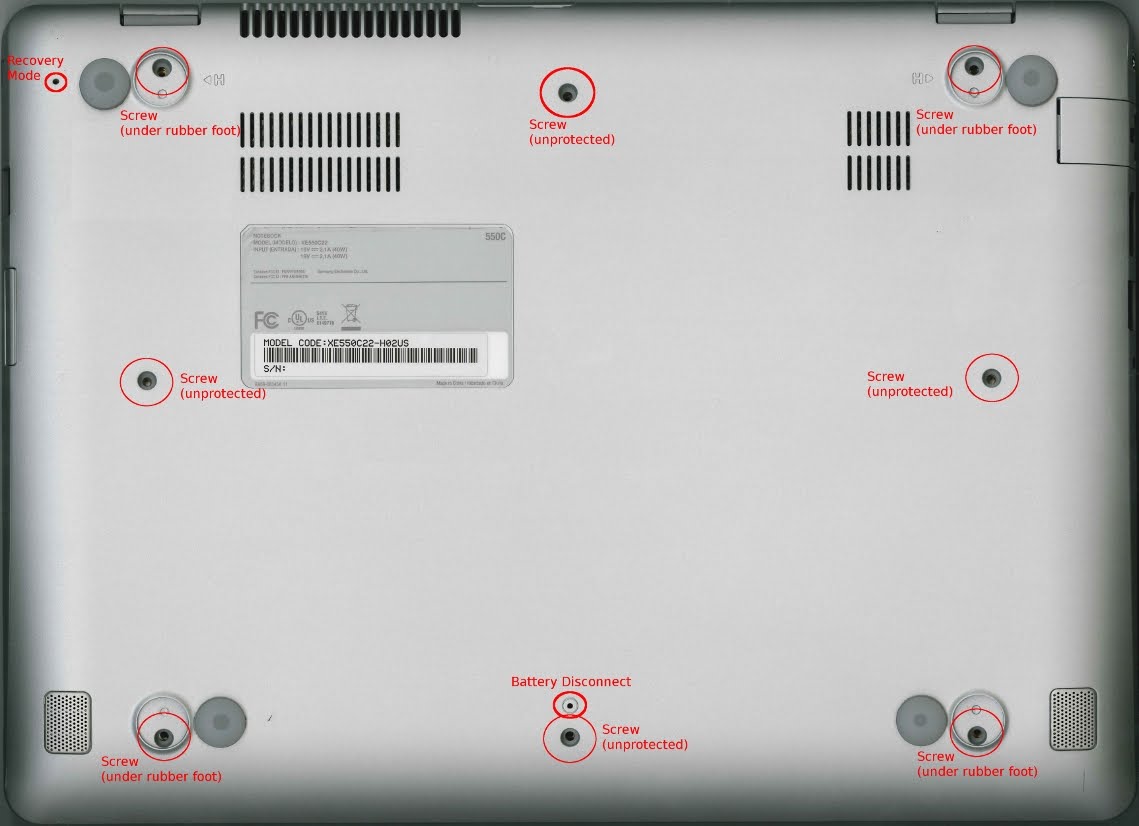
You can also force your chromebook into recovery mode (even in normal mode) by using the recovery mode button. The recovery button on the Chromebook is a tiny pinhole on the bottom, directly underneath the power button. On the Chromebox, the pinhole is on the back corner, next to the outer Display Port connector.
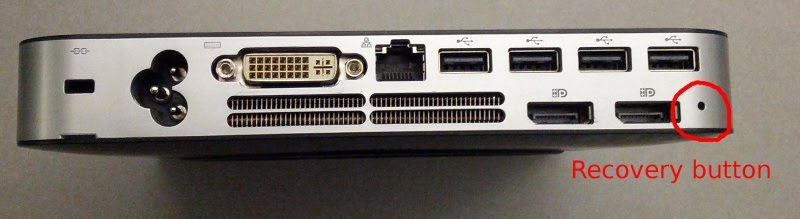
If you stick a paperclip into this hole, you'll feel it press a button. To force recovery mode, turn the device off, press this button, and while keeping it pressed, turn the device on again. This sometimes requires three hands or a bit of contortion, but you'll know it worked when you see the recovery screen instead of booting normally.
Follow the recovery mode instructions to restore your device to its factory-fresh state.
Note: The other pinhole on the bottom of the Series 5 550 Chromebook is the battery disconnect switch. When you poke it, it disconnects the battery so that the Chromebook can be shipped from the factory and left on shelves for months without the EC running and slowly draining power. But since the battery is off, opening the lid or poking the power button won't do anything. The only way to turn the device on again is to connect the AC power, wait a second or two for the EC to boot, and then press the power button. So don't poke anything into that hole unless you have your power cord handy.
Enabling VMX Support
These two devices shipped with a BIOS that hard disables VMX during the boot time. It is possible to fix this though. Please see the Hacking VMX Support Into Coreboot guide for more information.
Firmware
These devices use coreboot and Das
U-Boot to boot the system. You can find the
source in the ChromiumOS coreboot git
tree
and the ChromiumOS u-boot git
tree
in the firmware-uboot_v2-1299.B branches.
What's inside?
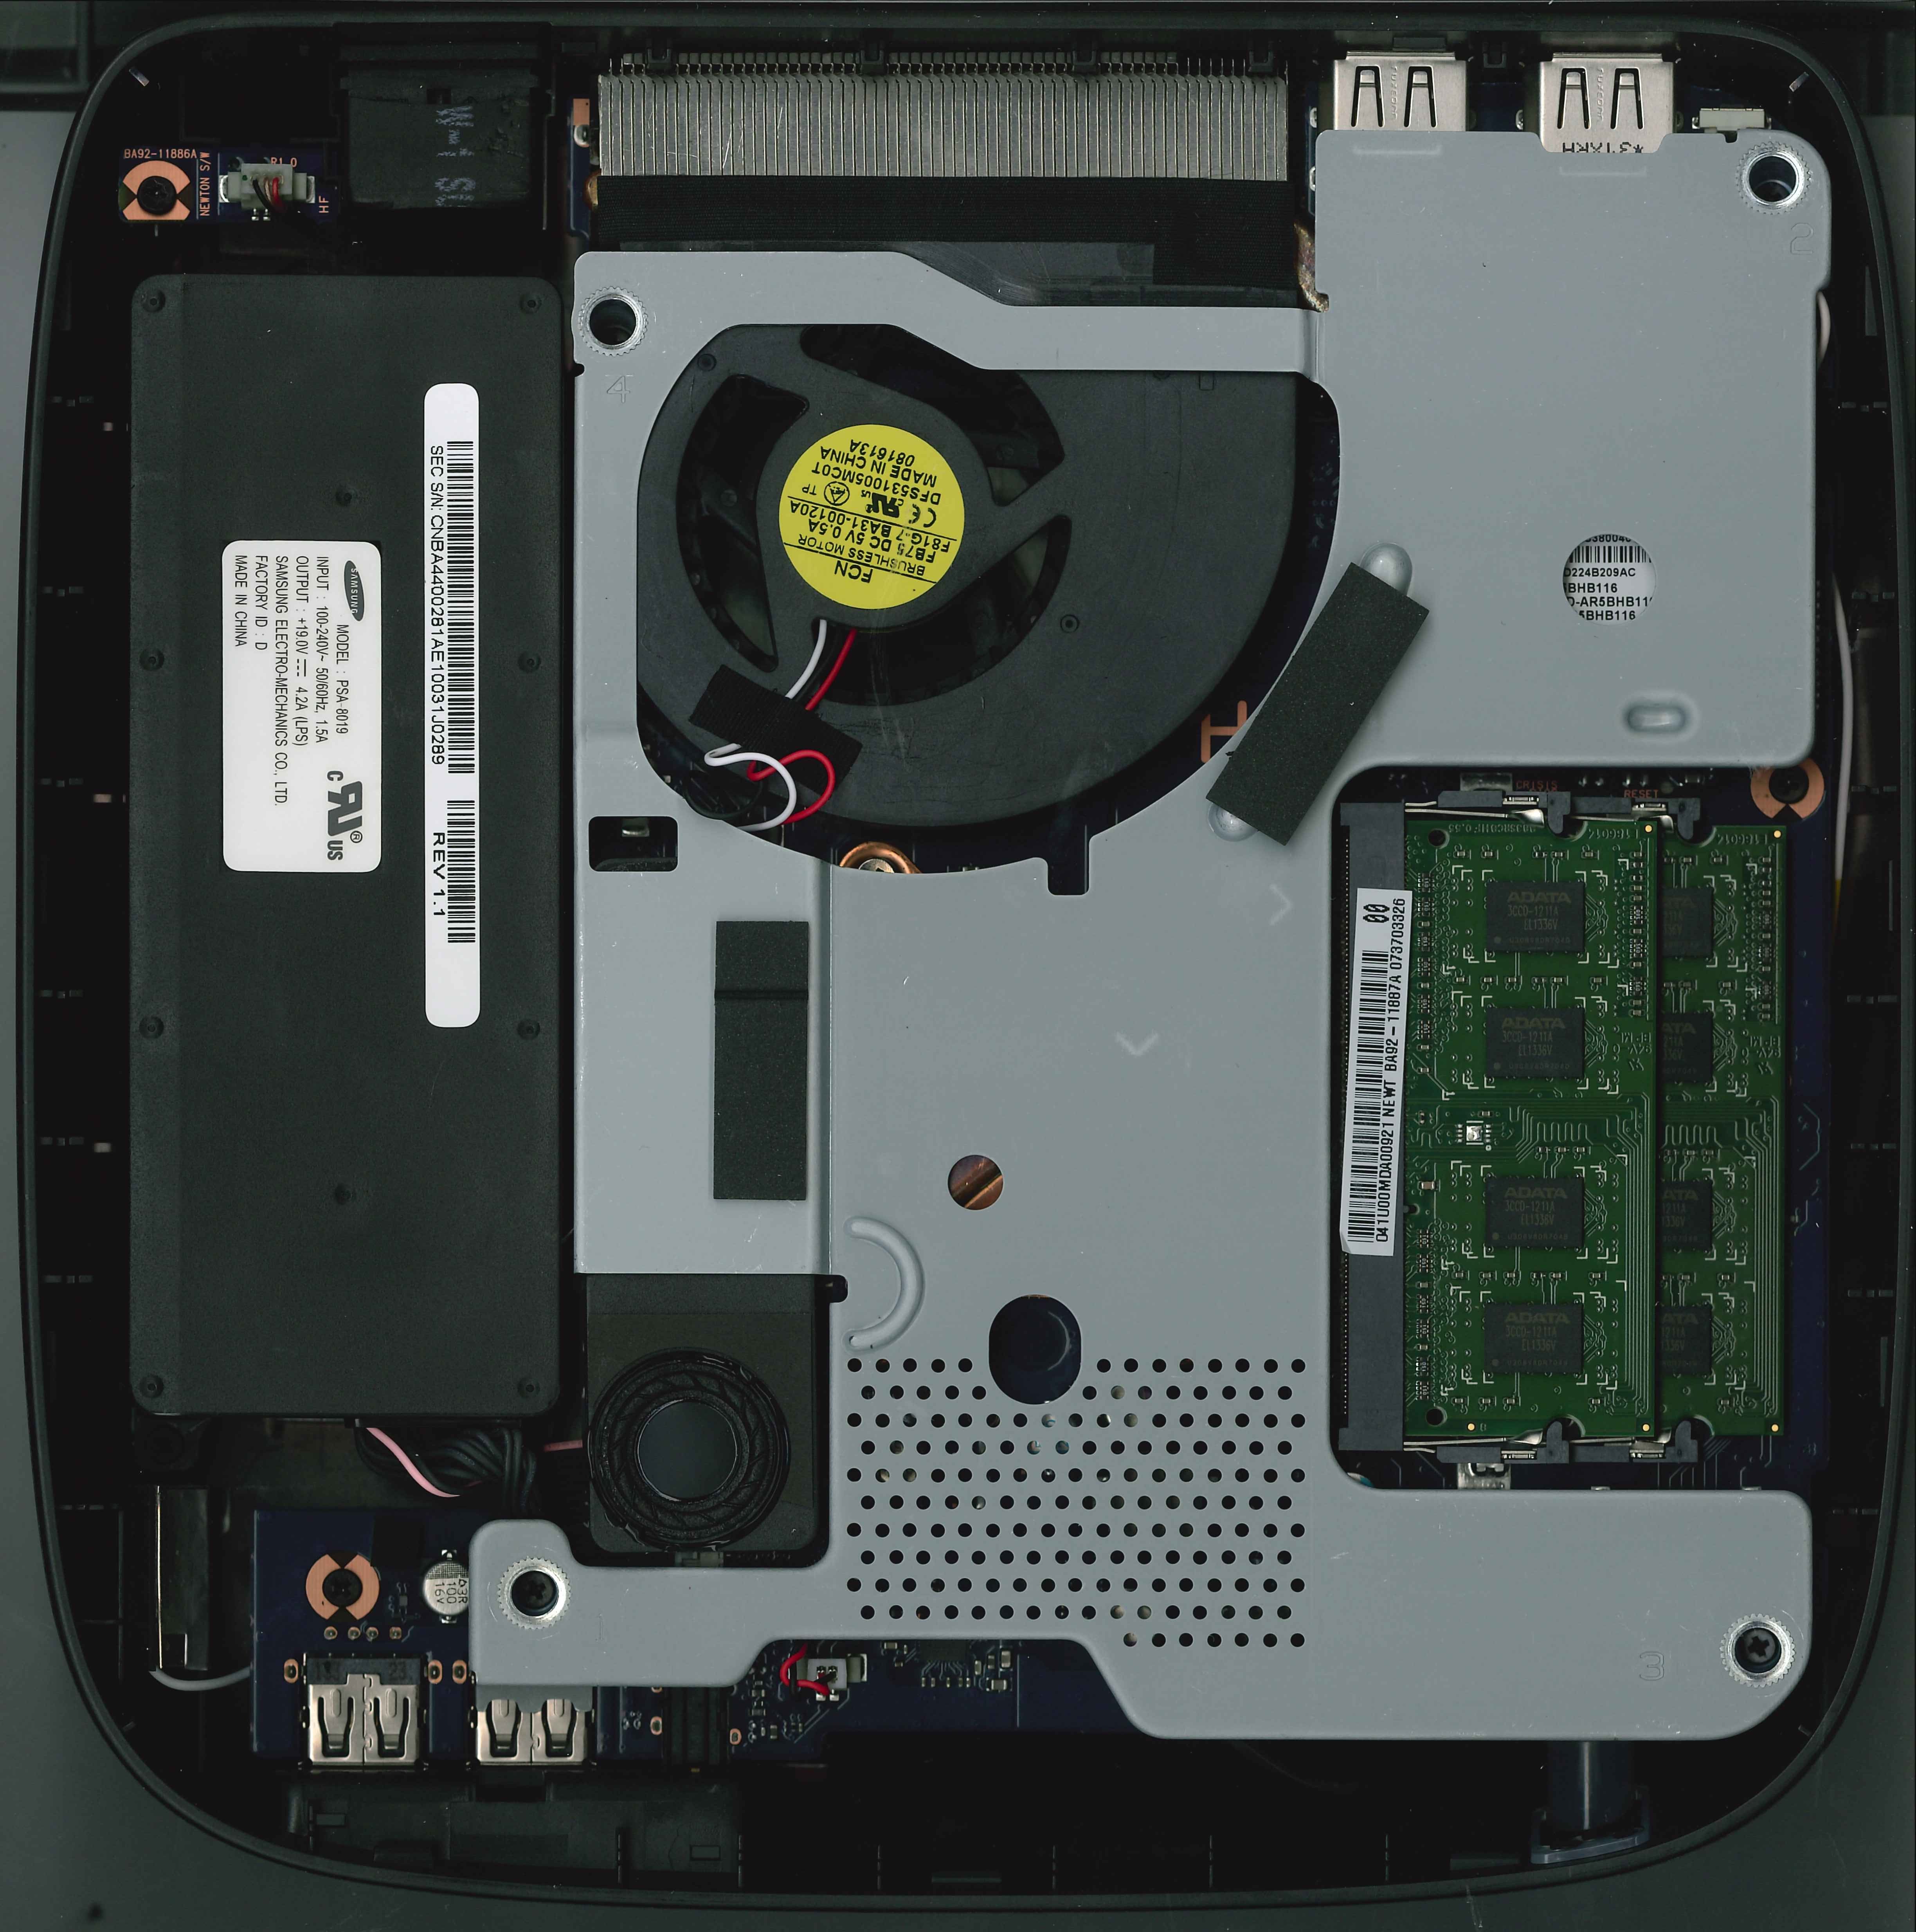
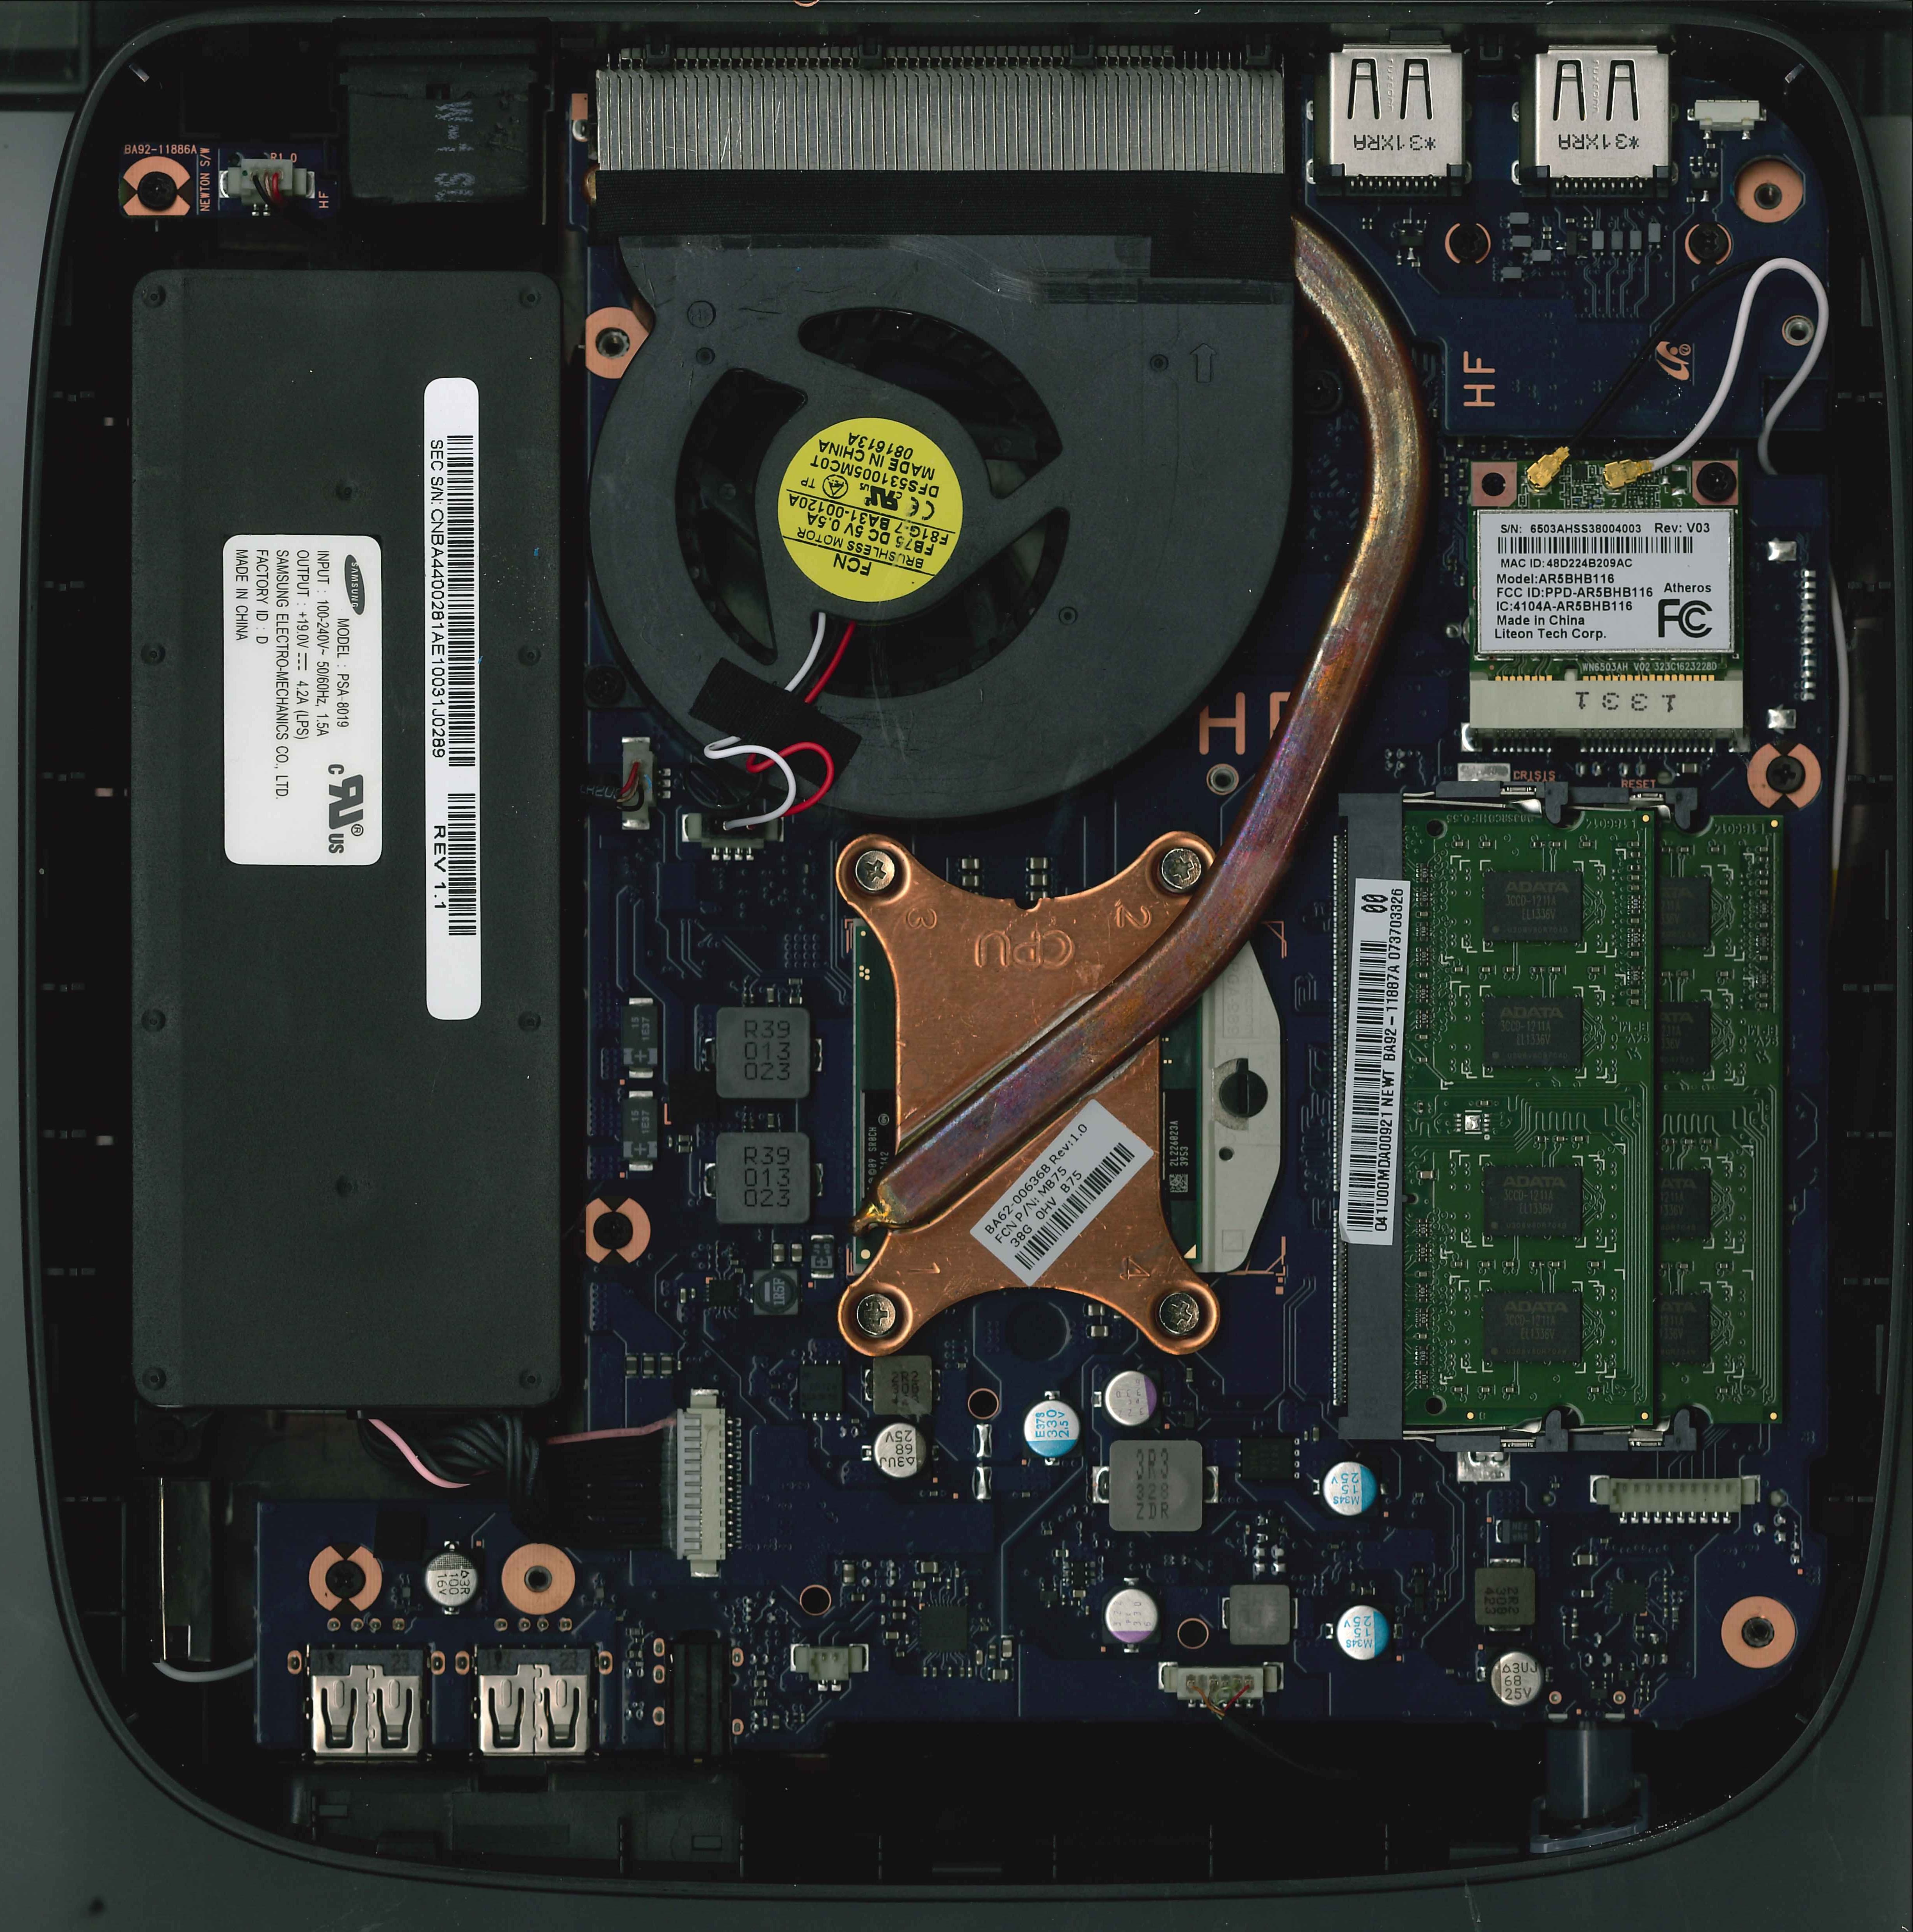
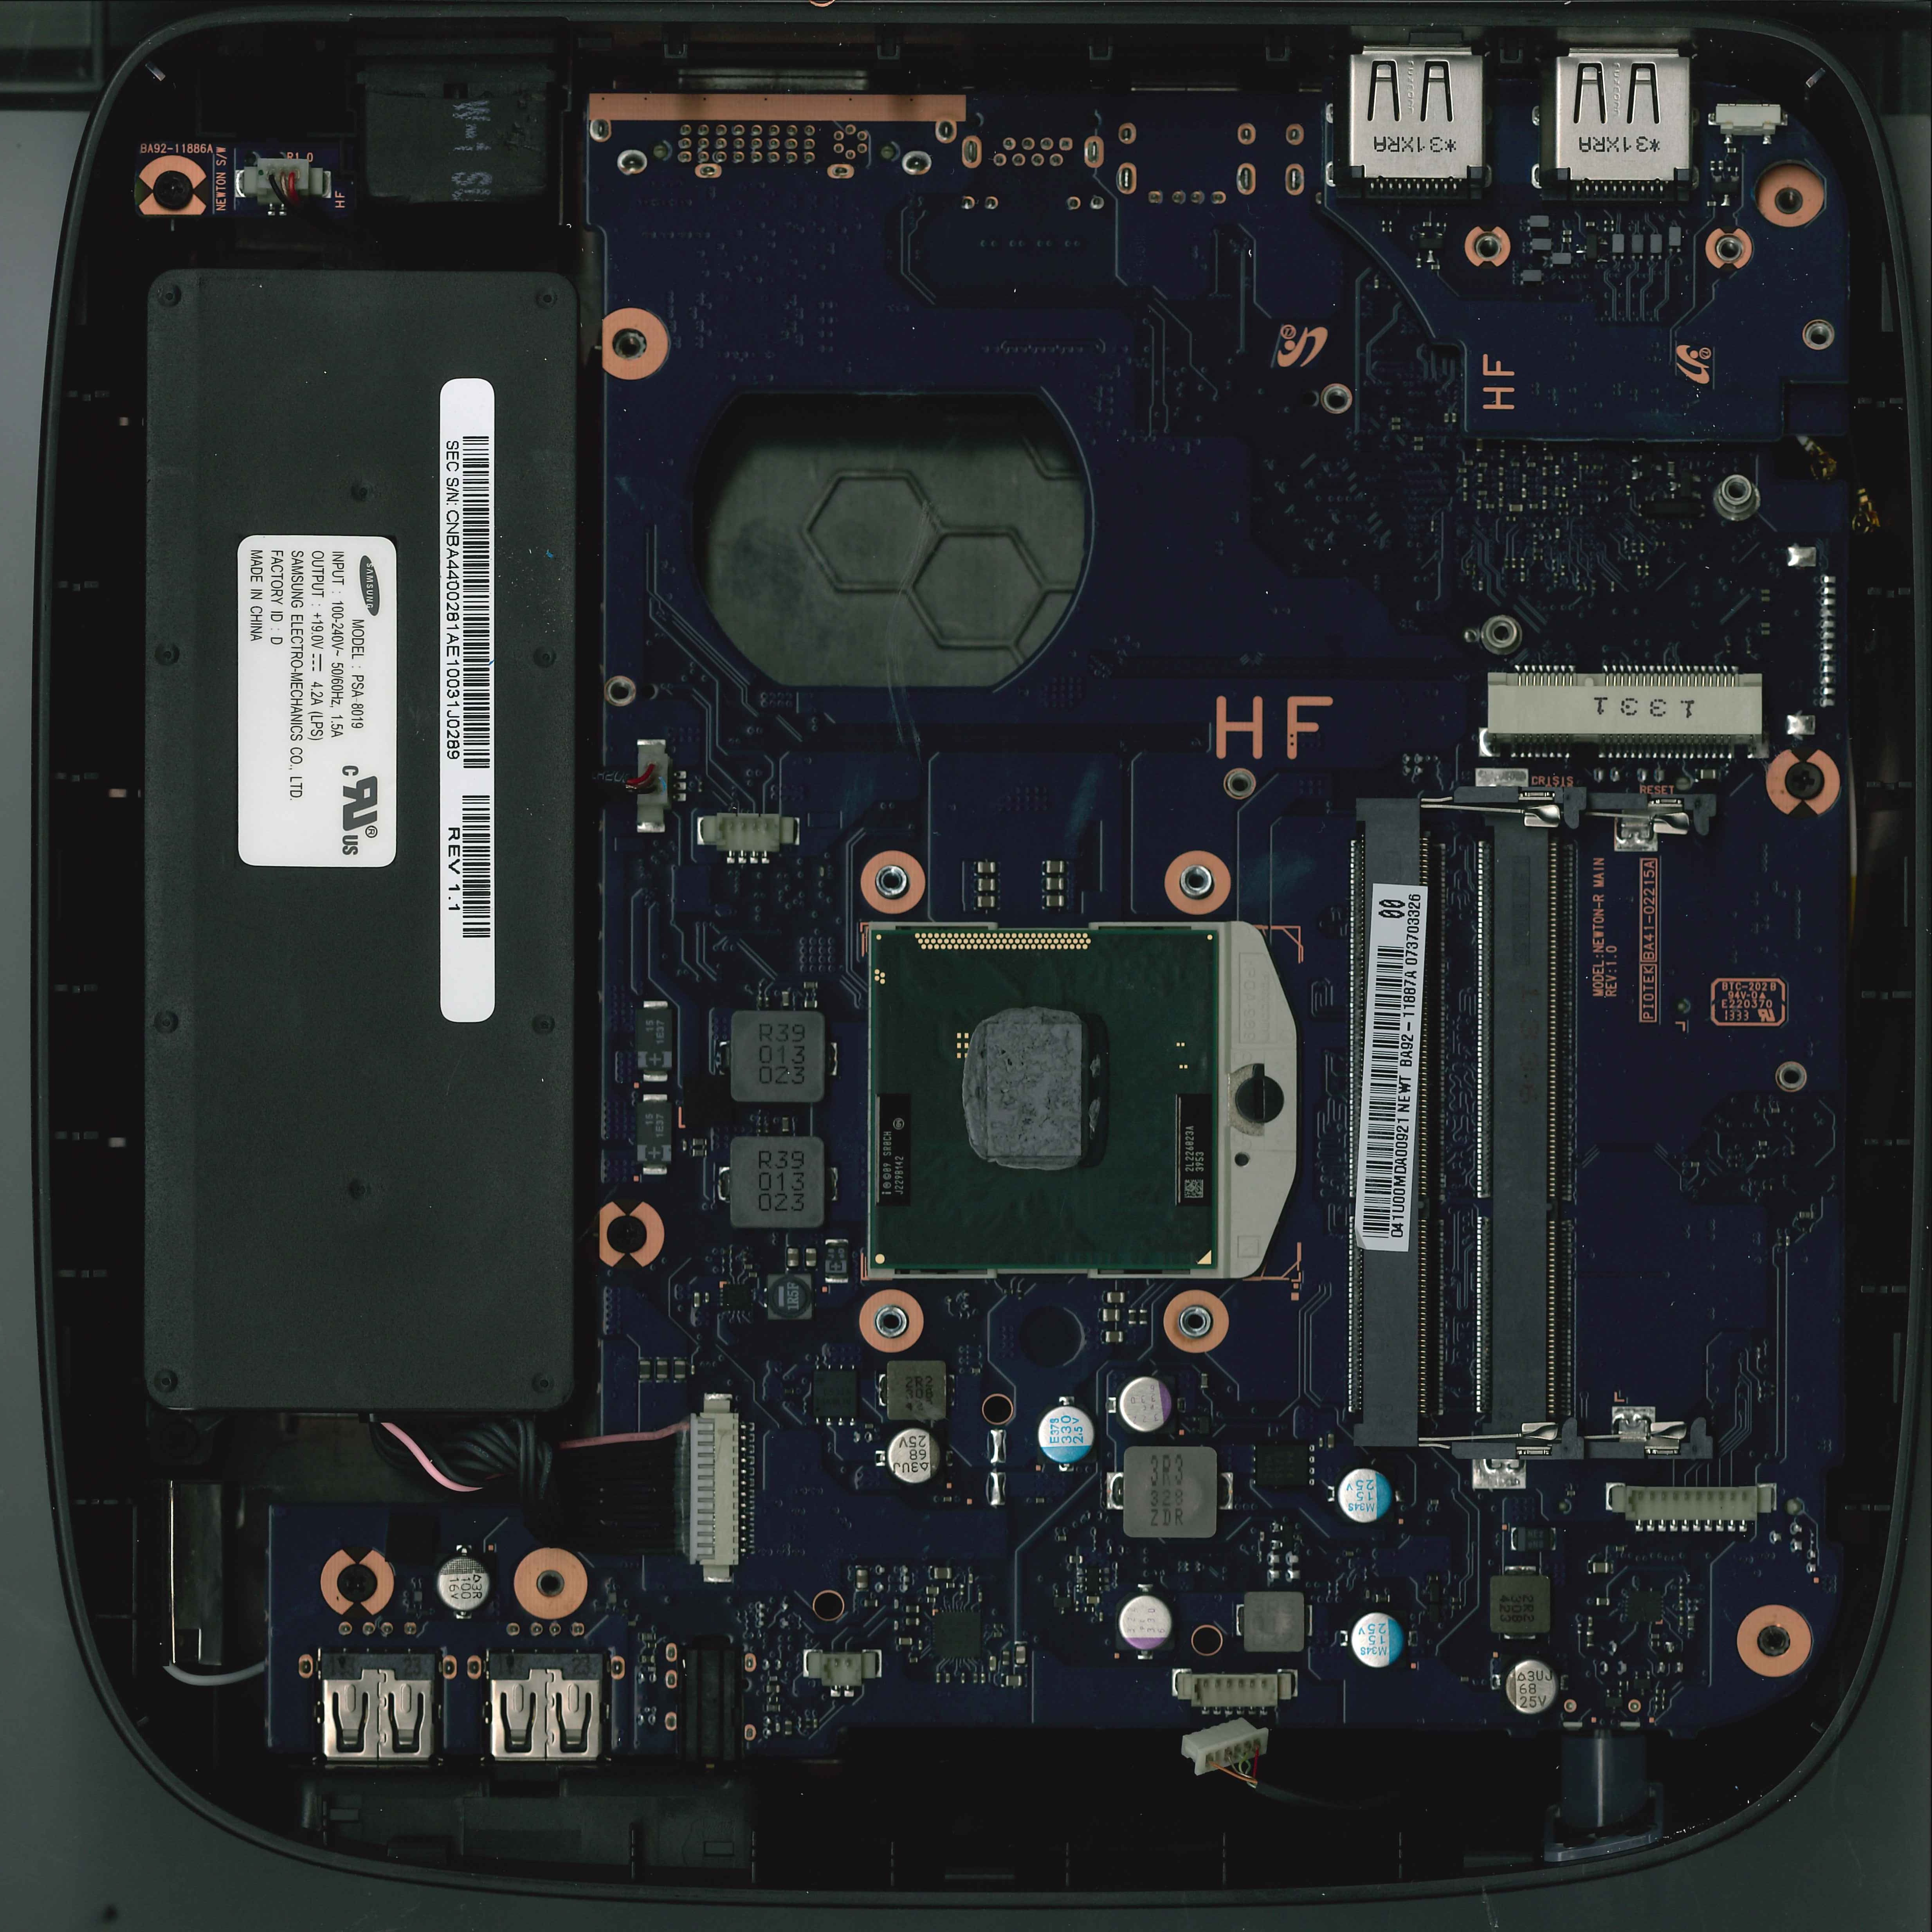
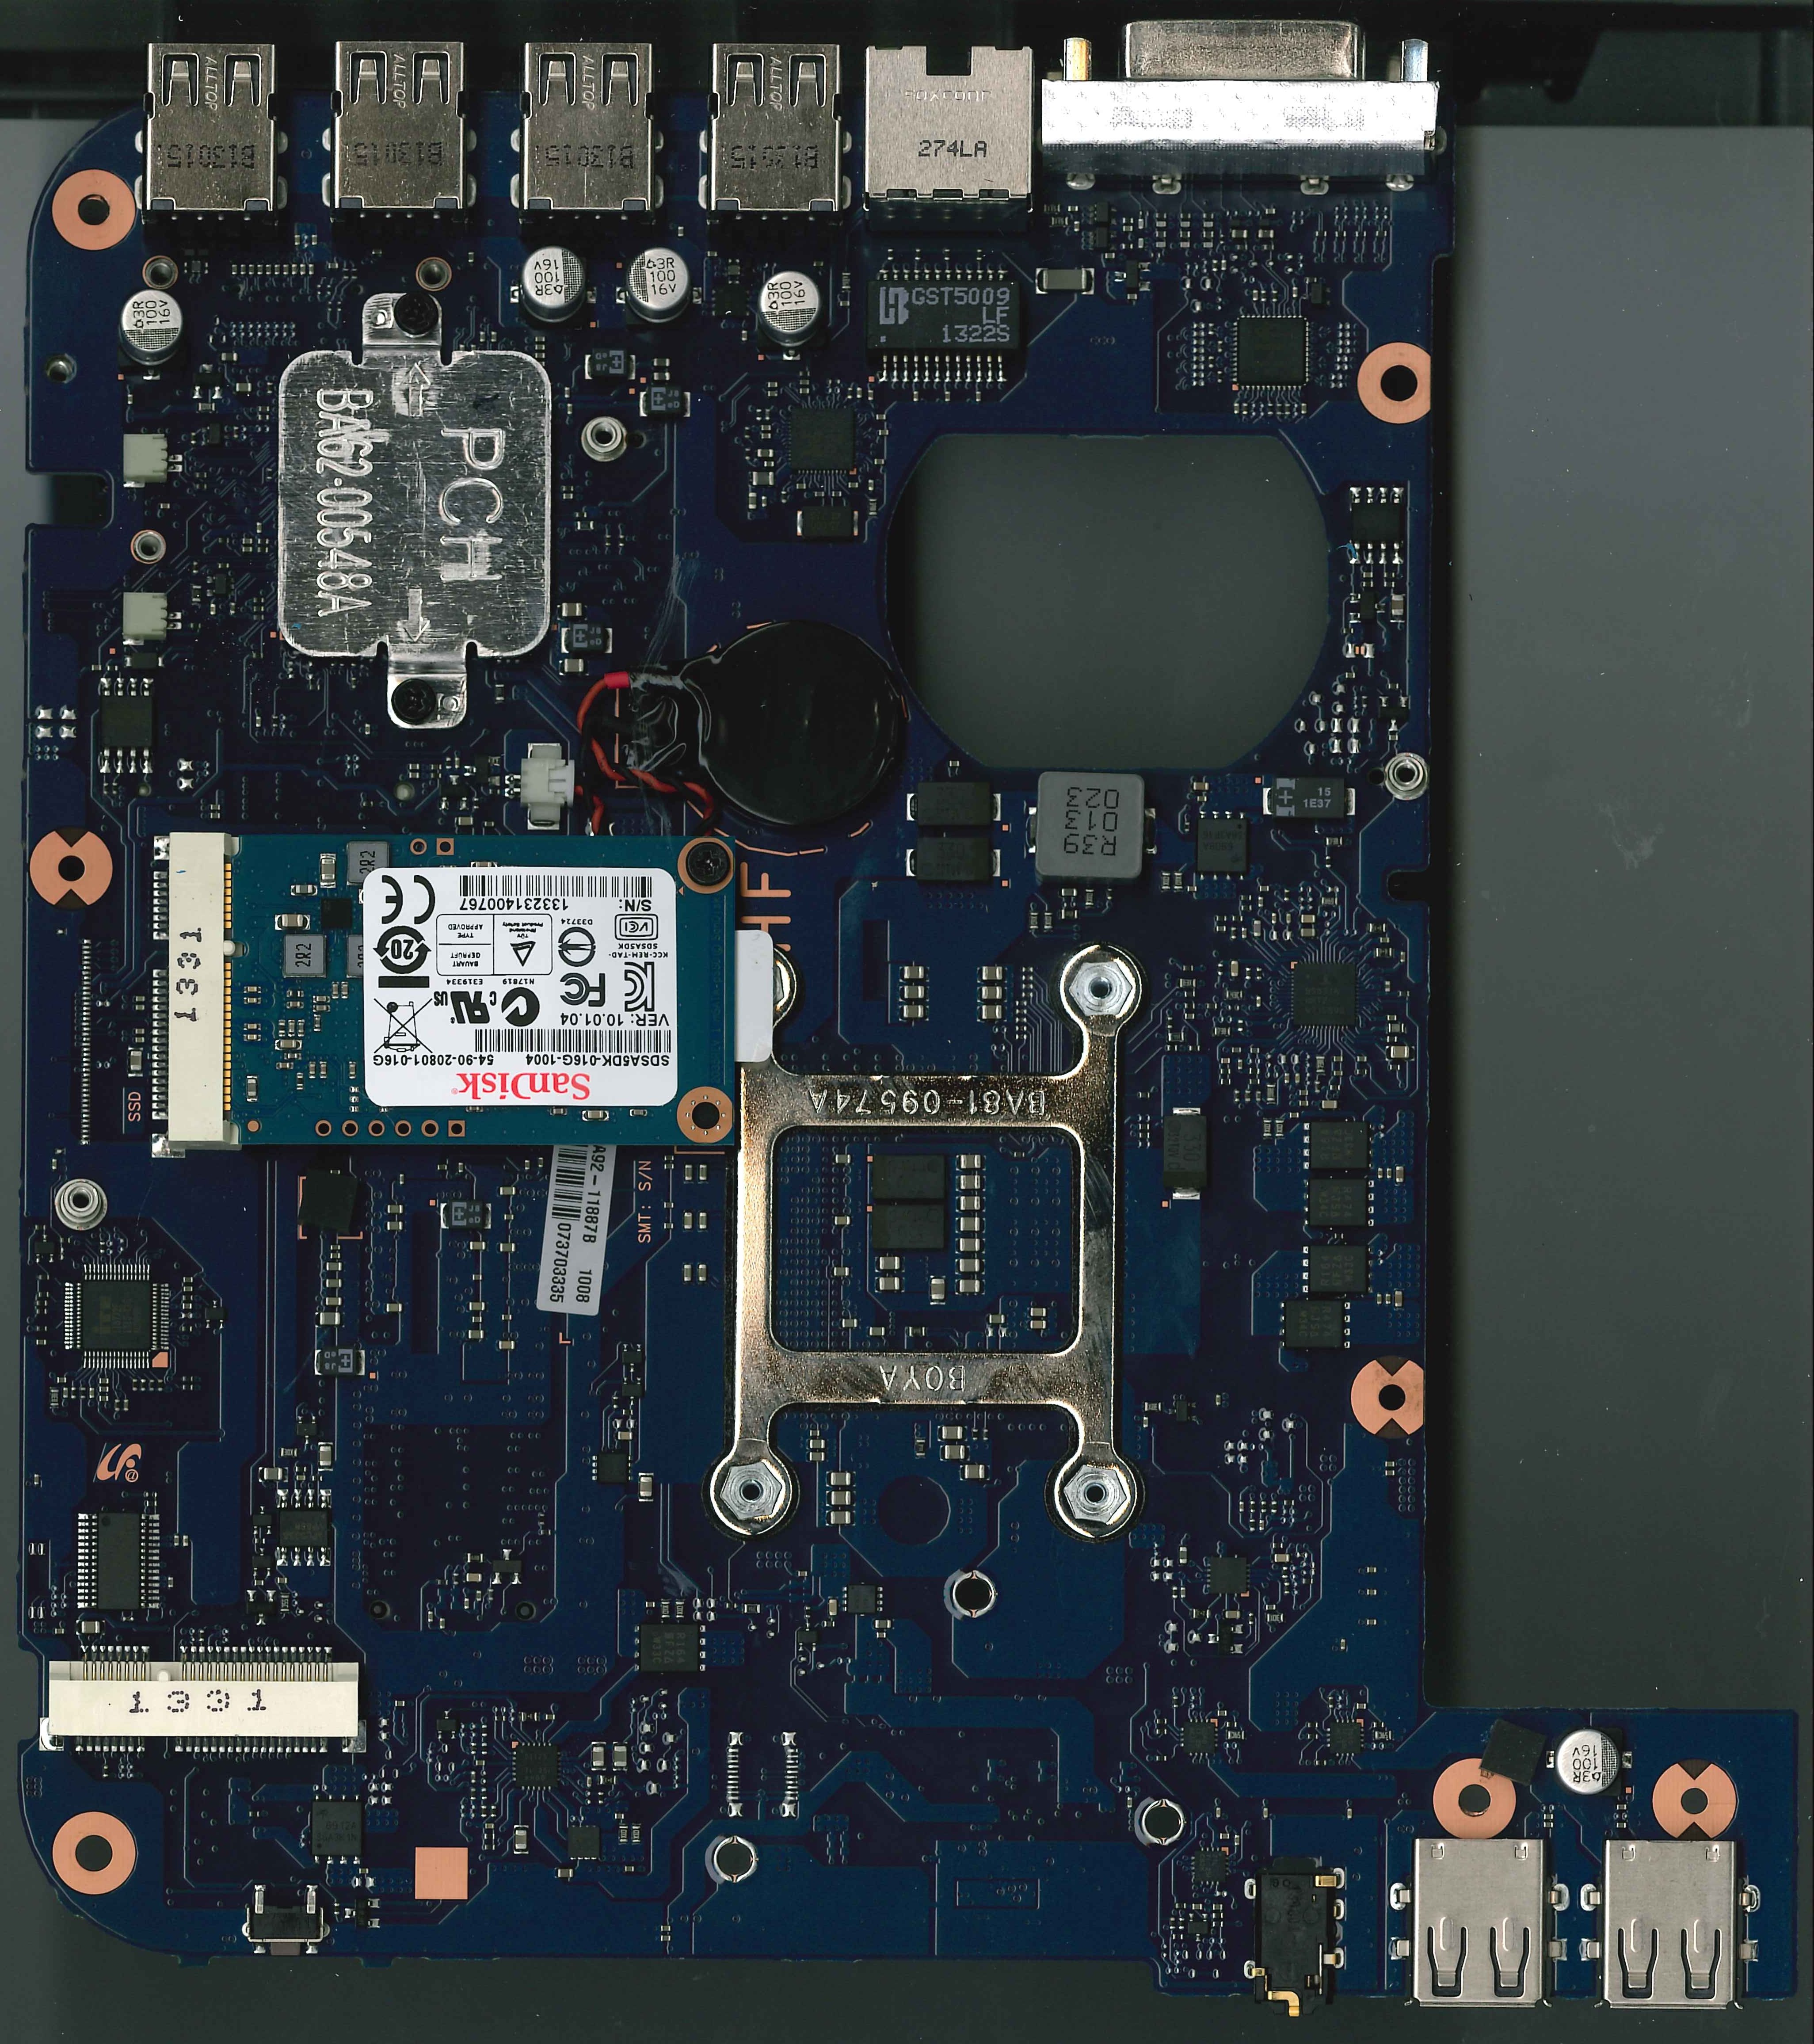
WARNING: Opening the case and fiddling with the stuff inside could easily brick your system and make it unrecoverable. DO NOT ATTEMPT if you are not familiar with this process.
Disassembly
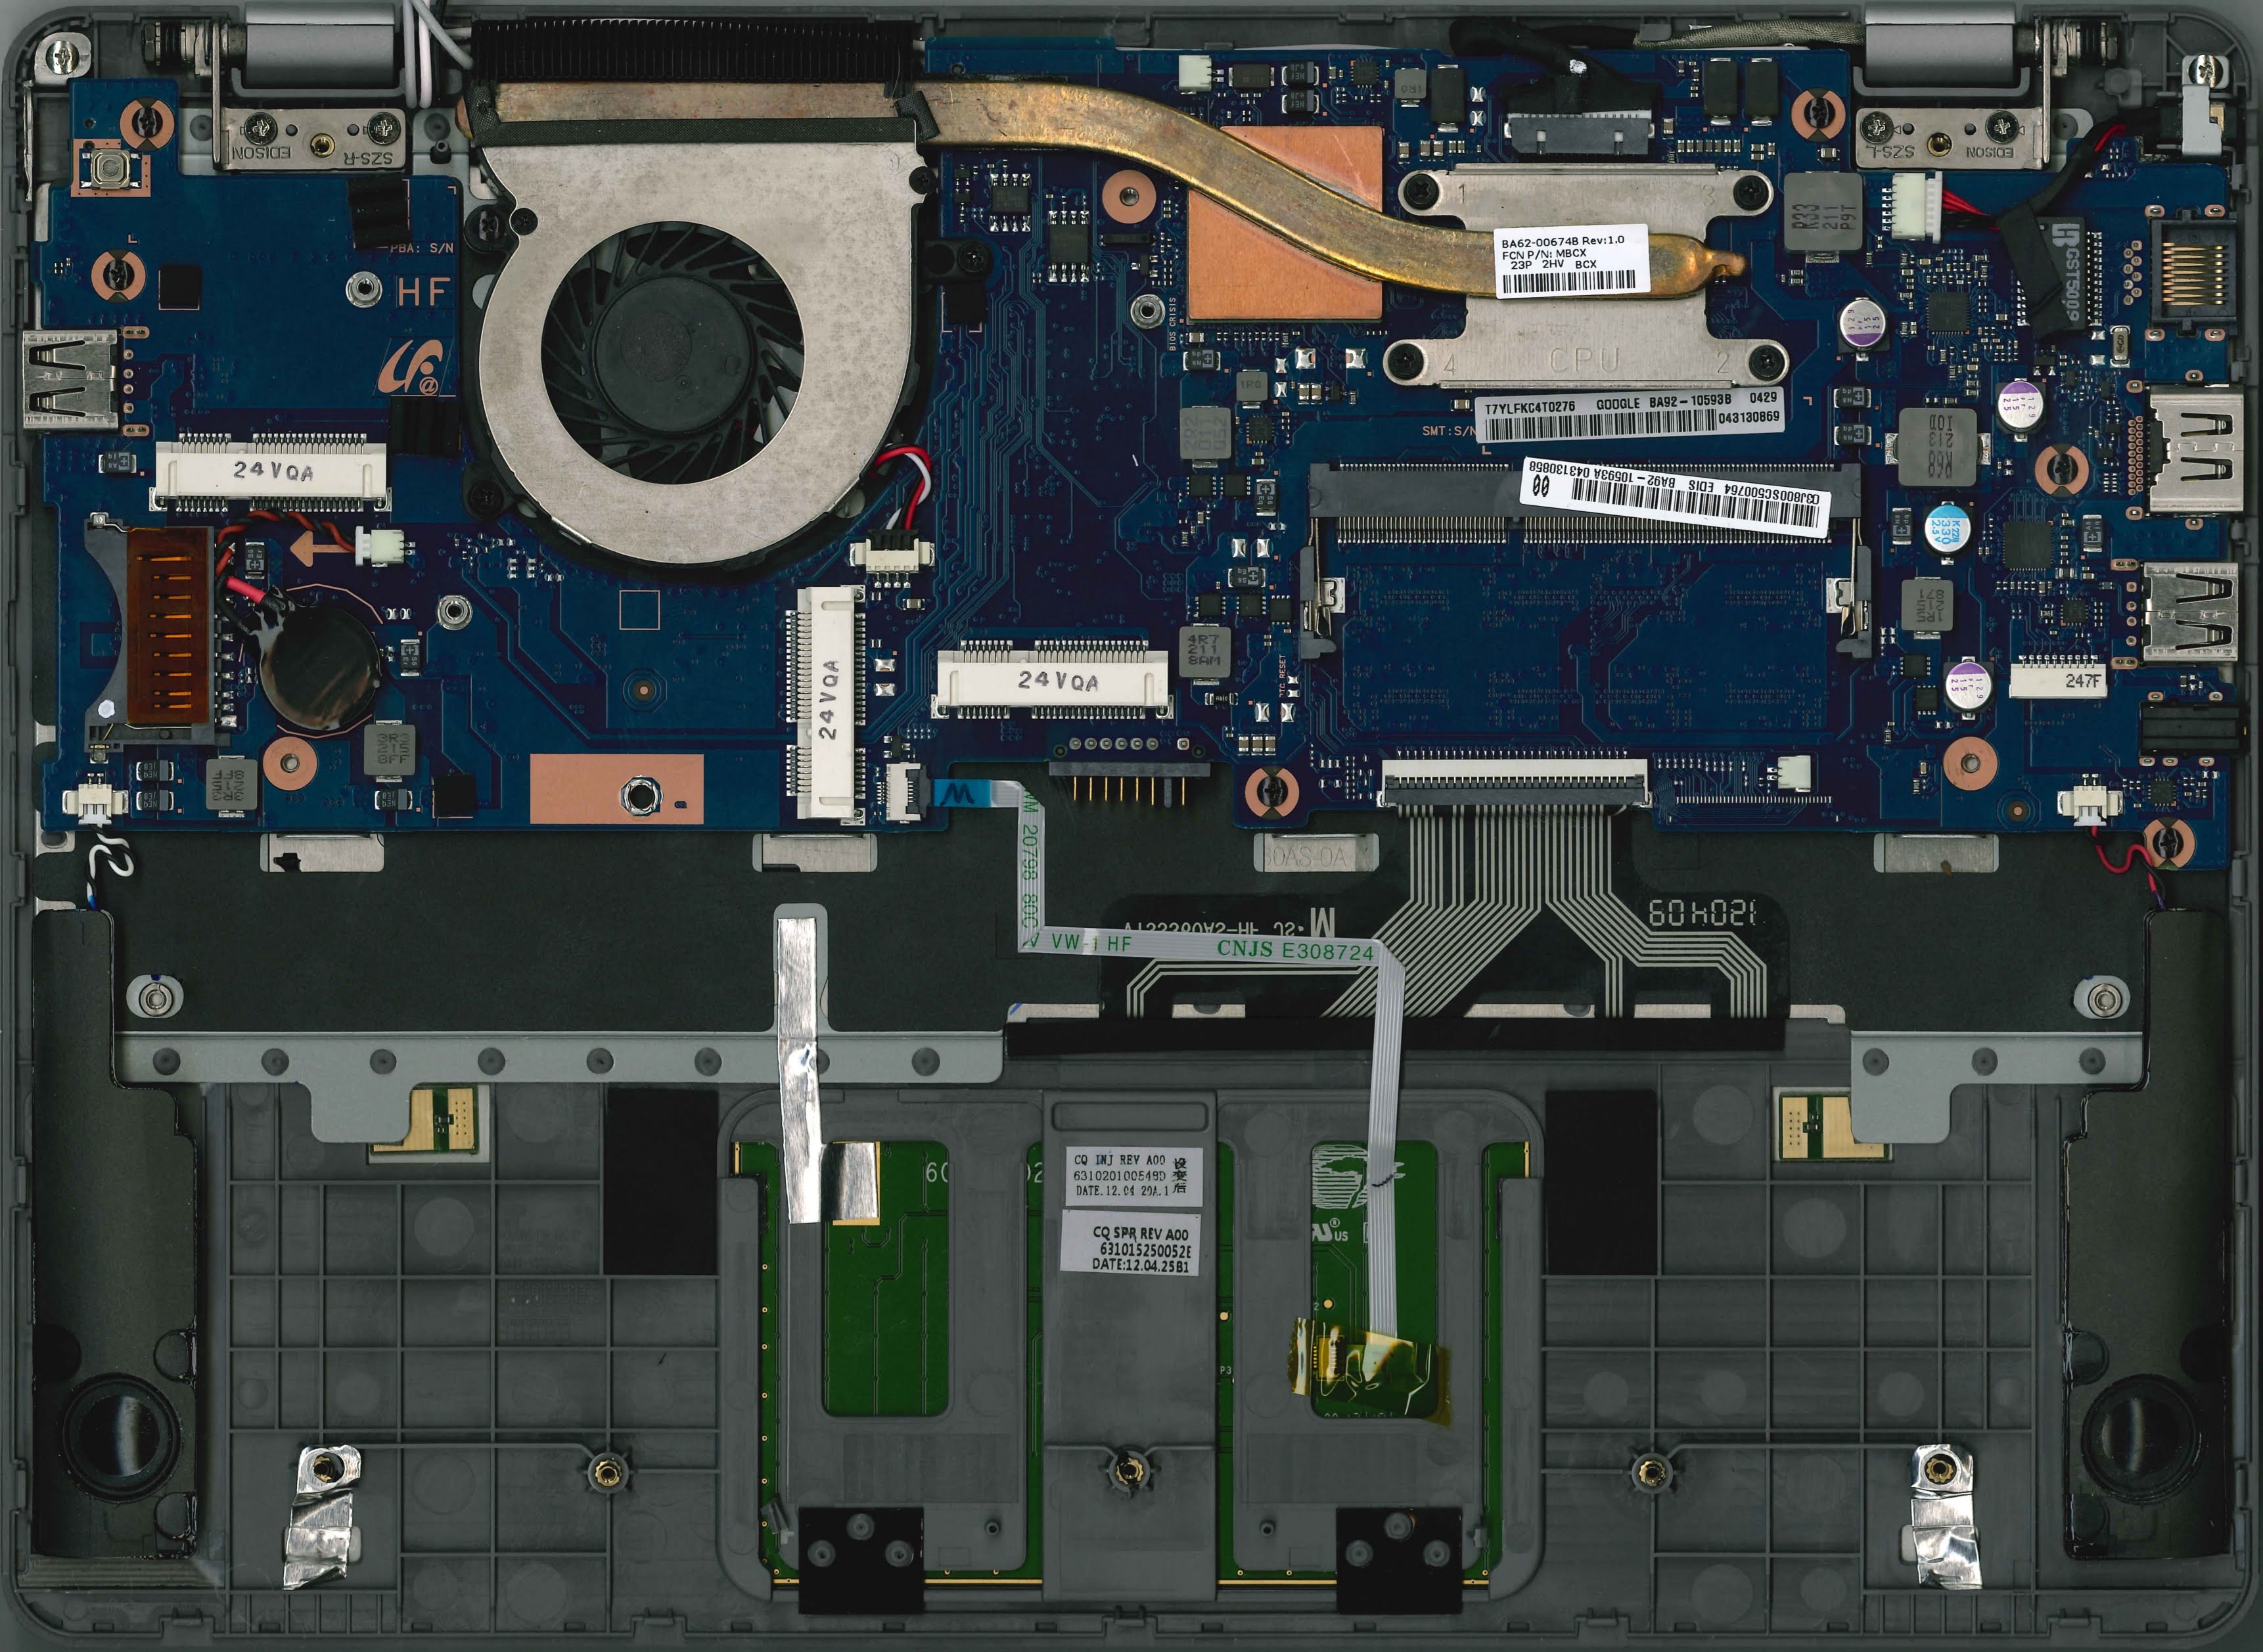
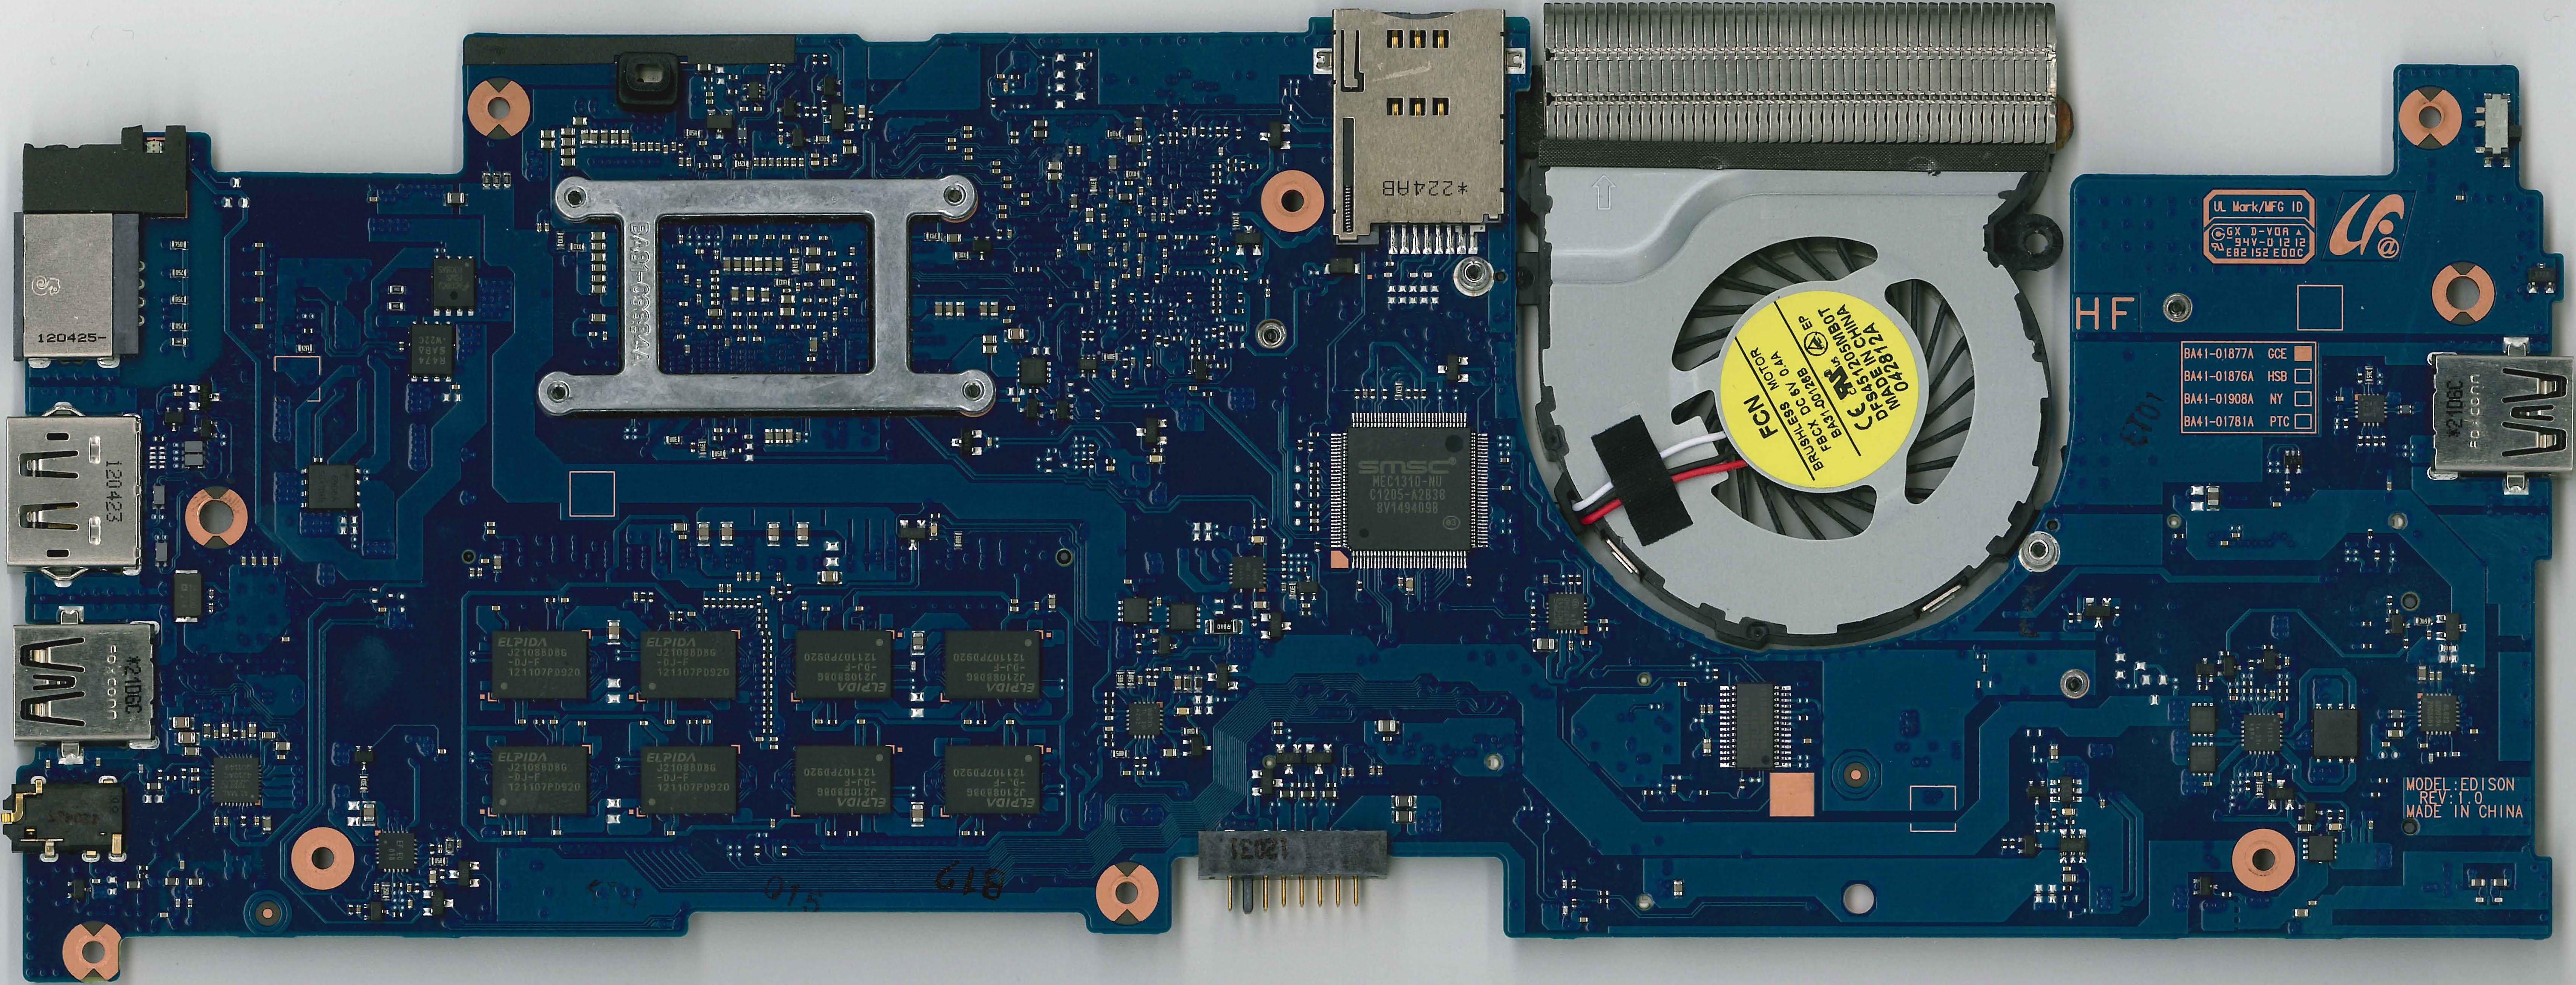
Taking apart your laptop is not encouraged. If you have hardware troubles, please seek assistance first from an authorized center. Be advised that disassembly might void warranties or other obligations, so please consult any and all paperwork your received first. If you just want to see what the inside looks like, gaze upon this (click for high res versions):
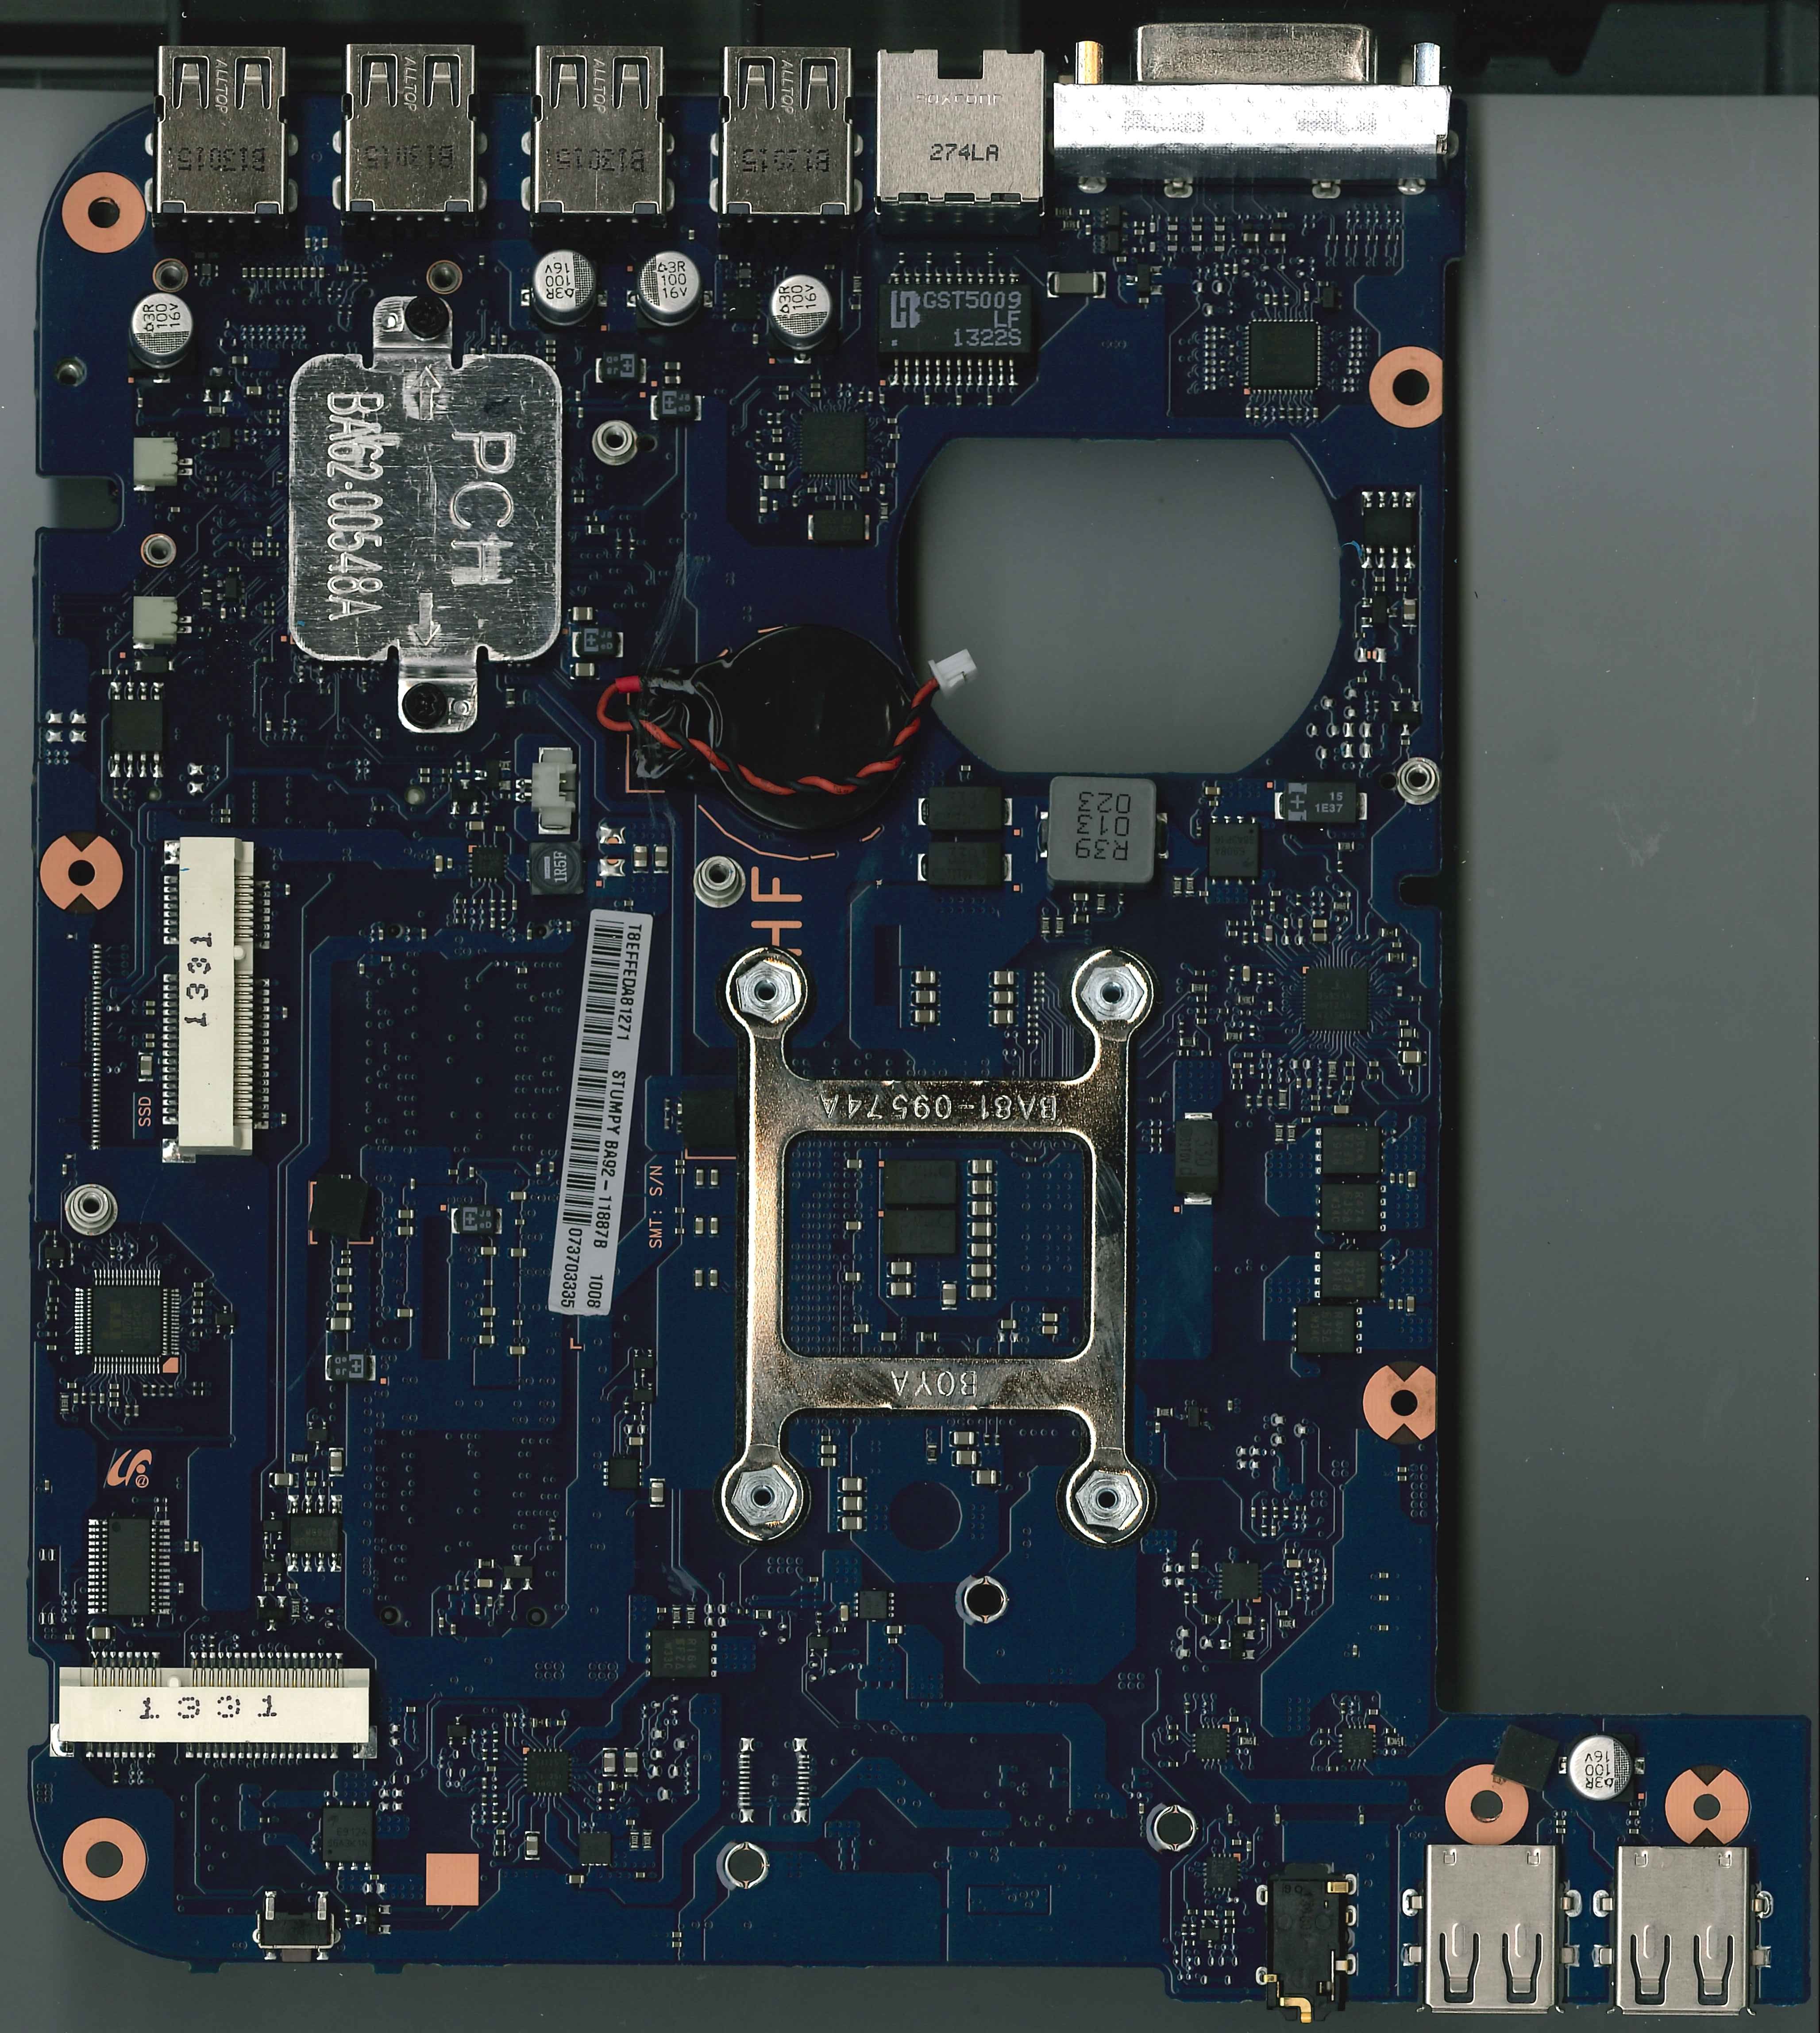
Samsung Series 5 550 Chromebook (lumpy)
However, we acknowledge that some people like to tinker. So here's a quick guide to taking it apart.
- Get a phillips head screw driver and a butter knife (any similar wide/flat material will do as long as one edge is not sharp)
- Shut the system down and close the lid
- Flip the laptop over so the bottom is facing up
- Locate the battery disconnect and stick a paper clip in there
- NOTE: The machine will not be able to power up again until you plug it in -- so you will need a power supply!
- Remove the 4 visible screws
- Remove the 4 rubber feet and the screws under them
- You should start removing them starting from the edge closest to the edge of the computer as that is where the screw hole is
- Now you will have to pull the top and bottom parts of the case apart
(see below for tips)
- Be aware that the case is held together by many plastic tabs
- Every time you get stuck and think it might be glued/screwed together, remember it is not -- it's just more plastic tabs
- Using your nails and butter knife, pull apart the case slight apart at one of the bottom corners (near the speakers)
- Slip the butter knife into the small gap
- Using the edge of the knife that is not, slide it along the
front edge of the case
- Wiggle it back and forth as you go
- Gently pull on the case to pop each tab as you go
- Once the front edge is open, move towards the back on each side until you get to the side ports (USB/SD)
- Now you should be able to gently pull & wiggle using the case itself
- Repeat until the whole thing comes off
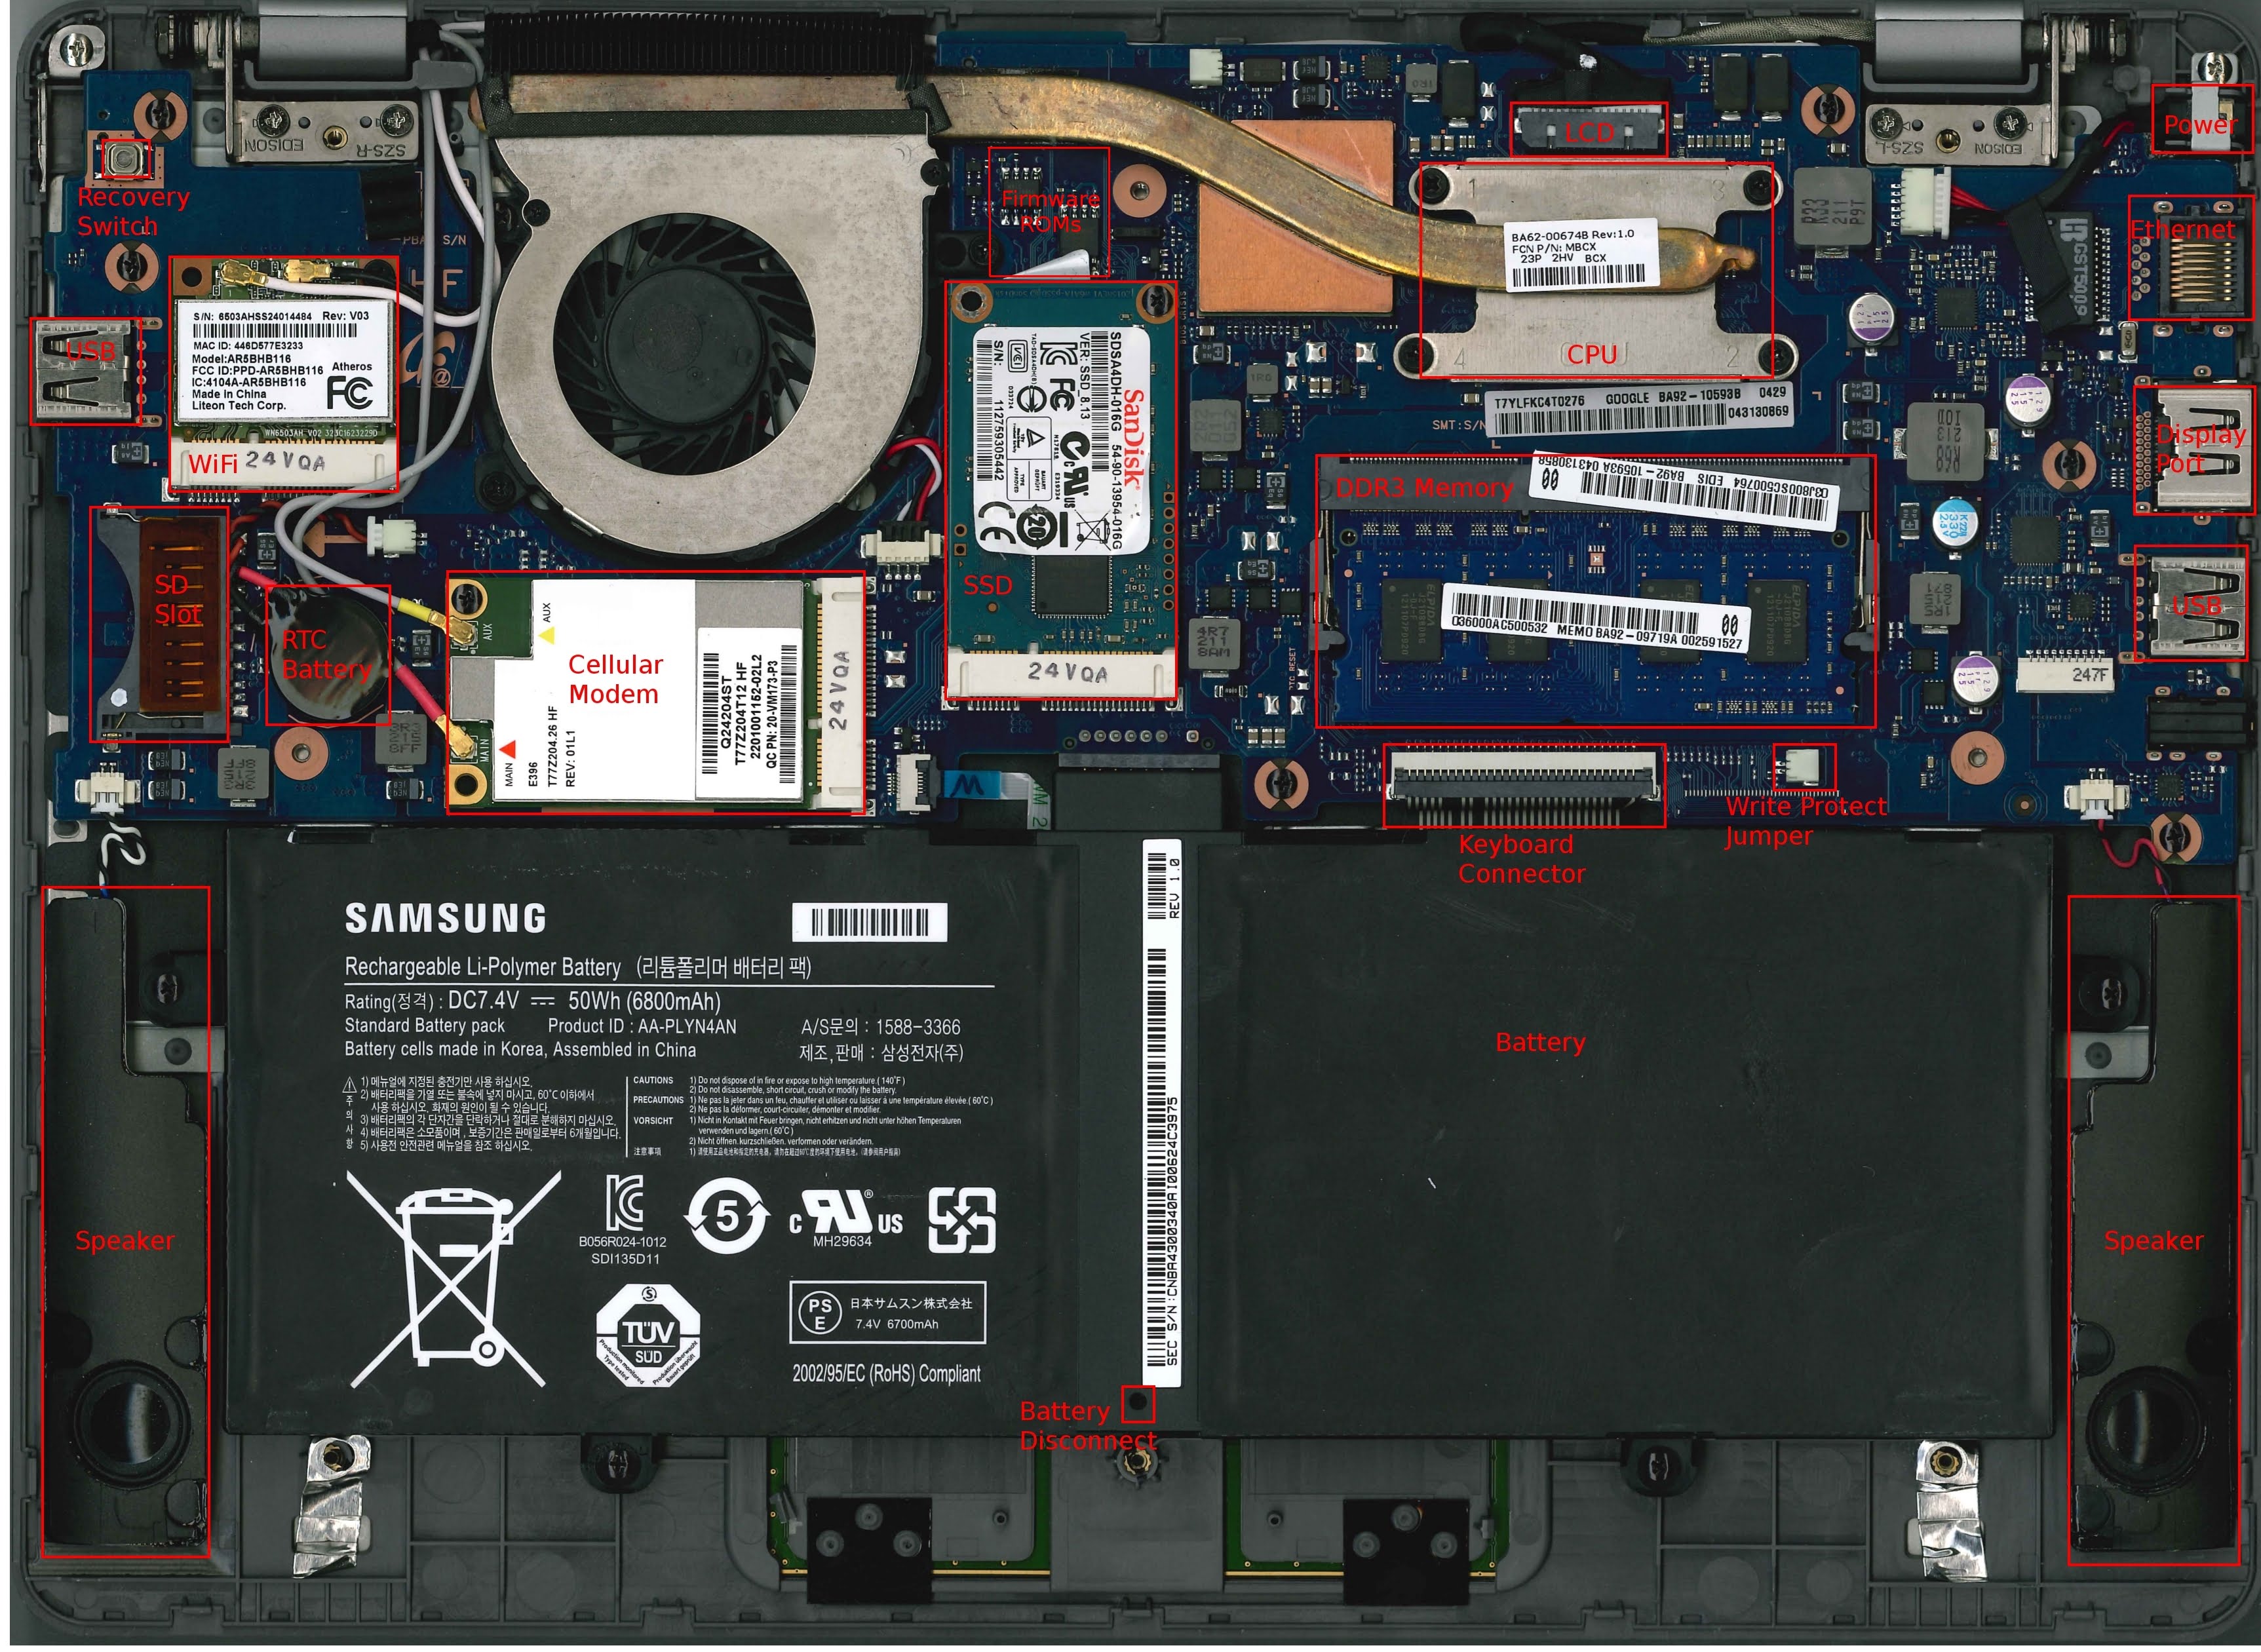
You'll see that some of the components are replaceable:
- The hard drive is a 16GiB mSATA
- There is one slot for 204-Pin DDR3 SO-DIMM laptop memory
- Power supply: 19V
 (DC) 2.1A
 (positive polarity
tip)
(positive polarity
tip) - The servo connector (may not be present on most units) is a now-obsolete 1x40 connector.
Samsung Series 3 Chromebox (stumpy)