Getting Around the Chromium Source Code Directory Structure
High-level overview
Chromium is separated into two main parts (excluding other libraries): the browser and the renderer (which includes Blink, the web engine). The browser is the main process and represents all the UI and I/O. The renderer is the (often) per-tab sub-process that is driven by the browser. It embeds Blink to do layout and rendering.
You will want to read and become familiar with our multi-process architecture and how Chromium displays web pages.
Top-level projects
When you Browse and Search the Chromium Code or Checkout the Chromium Code you will notice a number of top-level directories:
- android_webview: Provides a facade over src/content suitable for integration into the android platform. NOT intended for usage in individual android applications (APK). More information about the Android WebView source code organization.
- apps: Chrome packaged apps.
- base: Common code shared between all sub-projects. This contains things like string manipulation, generic utilities, etc. Add things here only if it must be shared between more than one other top-level project.
- breakpad: Google's open source crash reporting project. This is pulled directly from Google Code's Subversion repository.
- build: Build-related configuration shared by all projects.
- cc: The Chromium compositor implementation.
- chrome: The Chromium browser (see below).
- chrome/test/data: Data files for running certain tests.
- components: directory for components that have the Content Module as the uppermost layer they depend on.
- content: The core code needed for a multi-process sandboxed browser (see below). More information about why we have separated out this code.
- device: Cross-platform abstractions of common low-level hardware APIs.
- net: The networking library developed for Chromium. This can be
used separately from Chromium when running our simple test_shell in
the
webkitrepository. See alsochrome/common/net. - sandbox: The sandbox project which tries to prevent a hacked renderer from modifying the system.
- skia + third_party/skia: Google's Skia graphics library. Our additional classes in ui/gfx wrap Skia.
- sql: Our wrap around sqlite.
- testing: Contains Google's open-sourced GTest code which we use for unit testing.
- third_party: 200+ small and large "external" libraries such as
image decoders, compression libraries and the web engine Blink (here
because it inherits license limitations from WebKit). Adding new
packages.
- .../blink/renderer: The web engine responsible for turning HTML, CSS and scripts into paint commands and other state changes.
- tools
- ui/gfx: Shared graphics classes. These form the base of Chromium's UI graphics.
- ui/views: A simple framework for doing UI development, providing rendering, layout and event handling. Most of the browser UI is implemented in this system. This directory contains the base objects. Some more browser-specific objects are in chrome/browser/ui/views.
- url: Google's open source URL parsing and canonicalization library.
- v8: The V8 Javascript library. This is pulled directly from Google Code's Subversion repository.
For historical reasons, there are some small top level directories. Going forward, the guidance is that new top level directories are for applications (e.g. Chrome, Android WebView, Ash). Even if these applications have multiple executables, the code should be in subdirectories of the application
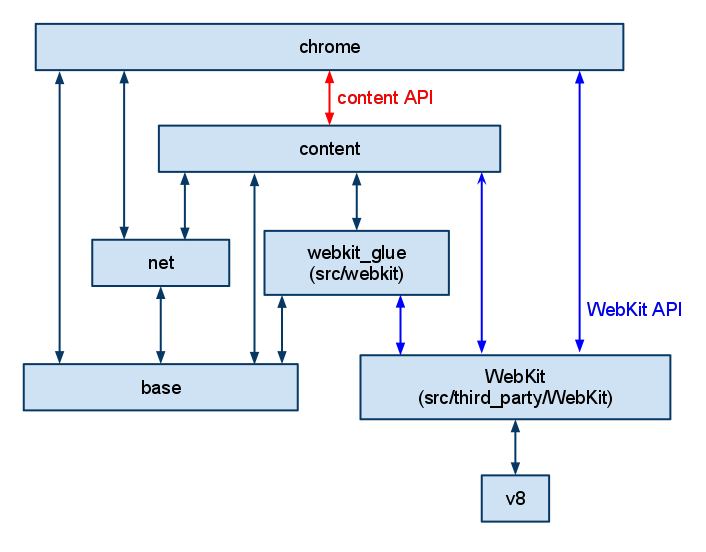
Here's a slightly dated diagram of the dependencies. In particular, WebKit is replaced by blink/renderer. A module that is lower can't include code from a higher module directly (i.e. content can't include a header from chrome), but talks to it using embedder APIs.
Quick reference for the directory tree under "content/"
- browser: The backend for the application which handles all I/O
and communication with the child processes . This talks to the
rendererto manage web pages. - common: Files shared between the multiple processes (i.e. browser and renderer, renderer and plugin, etc...). This is the code specific to Chromium (and not applicable to being in base).
- gpu: Code for the GPU process, which is used for 3D compositing and 3D APIs.
- plugin: Code for running browser plugins in other processes.
- ppapi_plugin: Code for the Pepper plugin process.
- renderer: Code for the subprocess in each tab. This embeds
WebKit and talks to
browserfor I/O. - utility: Code for running random operations in a sandboxed process. The browser process uses it when it wants to run an operation on untrusted data.
- worker: Code for running HTML5 Web Workers.
Quick reference for the directory tree under "chrome/"
- app: The "app" is the most basic level of the program. It is run
on startup, and dispatches to either the browser or renderer code
depending on which capabilities the current process is in. It
contains the projects for
chrome.exeandchrome.dll. You won't generally need to change this stuff except for resources like images and strings.- locales: Projects for building localized DLLs.
- resources: Icons and cursors.
- theme: Images for the theme of the window.
- browser: The frontend including the main window, UI, and the
backend for the application which handles all I/O and storage. This
talks to the
rendererto manage web pages.- ui model, view and controller code for UI features and functionality
- common: Files shared between the browser and the renderer that
is specific to the Chrome module.
- net: Some Chromium-specific stuff on top of the
nettop-level module. This should be merged with browser/net.
- net: Some Chromium-specific stuff on top of the
- installer: Source files and projects for making the installer (MSI package).
- renderer: Chrome specific code that runs in the renderer process. This adds Chrome features like autofill, translate etc to the content module.
- test:
- automation: Used by tests to drive the browser UI, for
example, in
test/ui,test/startup, etc. This communicates withbrowser/automationin the browser. - page_cycler: Code for running page cycler tests (for
performance measurement). See
tools/perf/dashboard. - reliability: Reliability tests for distributed testing of page loads for reliability metrics and crash finding.
- selenium: Code for running the selenium tests, which is a
third-party test suite for Ajaxy and JavaScript stuff. See
test/third_party/selenium_core. - startup: Tests for measuring startup performance. See
tools/perf/dashboardandtools/test/reference_build. - ui: UI tests for poking at the browser UI, opening tabs,
etc. It uses
test/automationfor doing most operations. - unit: The base code for the unit tests. The test code for
individual tests is generally alongside the code it is testing
in a
*_unittest.ccfile.
- automation: Used by tests to drive the browser UI, for
example, in
- third_party: Third party libraries that are specific to
Chromium. Some other third party libraries are in the top-level
third_partylibrary. - tools
- build: Tools and random stuff related to building.
- memory: Tools for memory stuff. Currently includes
gflagsfor setting page heap options. - perf/dashboard: Code for converting performance logs (for
example
test/startup_test) into data and graphs. - profiles: Generator for random history data. Used to make test profiles.
A personal learning plan
Eventually you’ll have your build setup, and want to get to work. In a perfect world, we would have all the time we needed to read every line of code and understand it before writing our first line of code. In practice, we’d have a hard time reading just the checkins that happen in one day if we did nothing else, so none of us will ever be able to read all of the code. So, what can we do? We suggest you develop your own plan for learning what you need, here are some suggested starting points.
Fortunately for us, Chromium has some top quality design docs here. While these can go a bit stale (for instance, when following along, you may find references to files that have been moved or renamed or refactored out of existence), it is awesome to be able to comprehend the way that the code fits together overall.
Read the most important dev docs
displaying-a-web-page-in-chrome
See if your group has any startup docs
There may be some docs that people working on the same code will care about while others don’t need to know as much detail.
Learn some of the code idioms:
important-abstractions-and-data-structures
Later, as time permits, skim all the design docs, reading where it seems relevant.
Get good at using code search (or your code browsing tool of choice)
Learn who to ask how the code works hints here.
Debug into the code you need to learn, with a debugger if you can, log statements and grepping if you cannot.
Look at the differences in what you need to understand and you currently understand. For instance, if your group does a lot of GUI programming, then maybe you can invest time in learning GTK+, Win32, or Cocoa programming.
Use source.chromium.org to search the source code. This can be particularly helpful if code moves around and our documentation is no longer accurate.
Code paths for common operations
There is additional information and more examples on how Chromium displays web pages.
Application startup
- Our
WinMainfunction is inchrome/app/main.cc, and is linked in thechromeproject. WinMainlaunches the Google Update Client, which is the installer/autoupdater. It will find the subdirectory for the current version, and loadchrome.dllfrom there.- It calls
ChromeMainin the newly loaded library, which is inchrome_main.ccin thechrome_dllproject. ChromeMaindoes initialization for common components, and then forwards to eitherRendererMaininchrome/renderer/renderer_main.ccif the command line flag indicates that this should be a subprocess, orBrowserMaininchrome/browser/browser_main.ccif not to load a new copy of the application. Since this is startup, we're launching the browser.BrowserMaindoes common browser initialization. It has different modes for running installed webapps, connecting to the automation system if the browser is being tested, etc.- It calls
LaunchWithProfileinbrowser_init.ccwhich creates a newBrowserobject inchrome/browser/ui/browser.cc. This object encapsulates one toplevel window in the application. The first tab is appended at this time.
Tab startup & initial navigation
BrowserImpl::AddTabinweblayer/browser/browser_impl.ccis called to append a new tab.- It will create a new
TabContentsobject frombrowser/tab_contents/tab_contents.cc TabContentscreates aRenderViewHost(chrome/browser/renderer_host/render_view_host.cc) via theRenderViewHostManager'sInit function inchrome/browser/tab_contents/render_view_host_manager.cc). Depending on theSiteInstance, theRenderViewHosteither spawns a new renderer process, or re-uses an existingRenderProcessHost.RenderProcessHostis the object in the browser that represents a single renderer subprocess.- The
NavigationControllerinchrome/browser/tab_contents/navigation_controller.ccwhich is owned by the tab contents, is instructed to navigate to the URL for the new tab inNavigationController::LoadURL. "Navigating from the URL bar" from step 3 onward describes what happens from this point.
Navigating from the URL bar
- When the user types into or accepts an entry in the URL bar, the
autocomplete edit box determines the final target URL and passes
that to
AutocompleteEdit::OpenURL. (This may not be exactly what the user typed - for example, an URL is generated in the case of a search query.) - The navigation controller is instructed to navigate to the URL in
NavigationController::LoadURL. - The
NavigationControllercallsTabContents::Navigatewith theNavigationEntryit created to represent this particular page transition. It will create a newRenderViewHostif necessary, which will cause creation of aRenderViewin the renderer process. ARenderViewwon't exist if this is the first navigation, or if the renderer has crashed, so this will also recover from crashes. Navigateforwards toRenderViewHost::NavigateToEntry. TheNavigationControllerstores this navigation entry, but it is marked as "pending" because it doesn't know for sure if the transition will take place (maybe the host can not be resolved).RenderViewHost::NavigateToEntrysends aViewMsg_Navigateto the newRenderViewin the renderer process.- When told to navigate,
RenderViewmay navigate, it may fail, or it may navigate somewhere else instead (for example, if the user clicks a link).RenderViewHostwaits for aViewHostMsg_FrameNavigatefrom theRenderView. - When the load is "committed" by WebKit (the server responded and is
sending us data), the
RenderViewsends this message, which is handled inRenderViewHost::OnMsgNavigate. - The
NavigationEntryis updated with the information on the load. In the case of a link click, the browser has never seen this URL before. If the navigation was browser-initiated, as in the startup case, there may have been redirects that have changed the URL. - The
NavigationControllerupdates its list of navigations to account for this new information.
Navigations and session history
Each NavigationEntry stores a page ID and a block of history state data. The
page ID is used to uniquely identify a page load, so we know which
NavigationEntry it corresponds to. It is assigned when the page is committed
commit, so a pending NavigationEntry will have a page ID of -1. The history
state data is simply a WebCore::HistoryItem serialized to a string. Included
on this item are things like the page URL, subframe URLs, and form data.
- When the browser initiates the request (typing in the URL bar, or
clicking back/forward/reload)
- A
WebRequestis made representing the navigation, along with extra information like a page ID for bookkeeping. New navigations have an ID of -1. Navigations to old entries have the ID assigned to theNavigationEntrywhen the page was first visited. This extra information will be queried later when the load commits. - The main
WebFrameis told to load the new request.
- A
- When the renderer initiates the request (user clicks a link,
javascript changes the location, etc):
WebCore::FrameLoaderis told to load the request via one of its bajillion varied load methods.
- In either case, when the first packet from the server is received, the load is committed (no longer "pending" or "provisional").
- If this was a new navigation,
WebCorewill create a newHistoryItemand add it to theBackForwardList, aWebCoreclass. In this way, we can differentiate which navigations are new, and which are session history navigations. RenderView::DidCommitLoadForFramehandles the commit for the load. Here, the previous page's state is stored in session history, via theViewHostMsg_UpdateStatemessage. This will tell the browser to update the correspondingNavigationEntry(identified byRenderView'scurrentpage ID) with the new history state.RenderView'scurrentpage IDis updated to reflect the committed page. For a new navigation, a new uniquepage IDis generated. For a session history navigation, it will be thepage IDoriginally assigned when it was first visited, which we had stored on theWebRequestwhen initiating the navigation.- A
ViewHostMsg_FrameNavigatemessage is sent to the browser, updating the correspondingNavigationEntry(identified byRenderView'snewly updatedpage ID) with the new URL and other information.