Developer mode
Production ChromeOS devices that are shipped from the factory are locked down and will not let you make changes to the software. This page describes how to enable developer mode and get root access to your system.
Enable Developer Mode
Before entering developer mode it is important to understand that transitioning to or from developer mode will trigger a Mode Transition Wipe which wipes the stateful partition of the device.
Modern ChromeOS devices can be put into developer mode by pressing specific keys while ChromeOS is booting:
*** note Caution: Modifications you make to the system are not supported by Google, may cause hardware, software or security issues and may void warranty.
*** note Googlers: Devices you get from corp or for development may have Developer mode blocked by Enterprise Policy. If you are on the ChromeOS team, you can enable Developer Mode by first logging in with your @google.com email, opening chrome://policy, clicking Reload Policies, and confirming that DeviceBlockDevMode is false. After confirming that, follow the normal procedure to put your device into developer mode.
NOTE: Putting your device into developer mode inherently makes it a little less secure. Specifically, it makes the "verified boot" that's built-in to your hardware a little bit more lax, allowing your hardware to run custom (non-Google-signed) images. It also gives you access to a "root" shell.
If you’re encountering issues putting your device into Developer Mode, it's possible that your device administrator has blocked Developer Mode access on your device. Please follow the link to read more details about blocked Developer Mode.
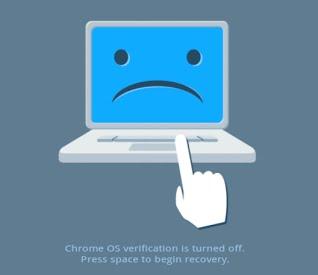
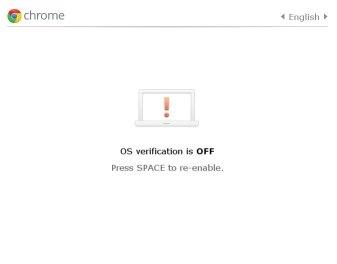
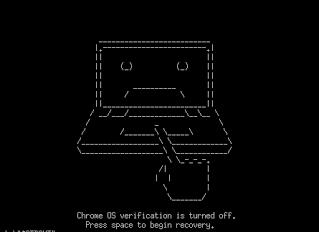
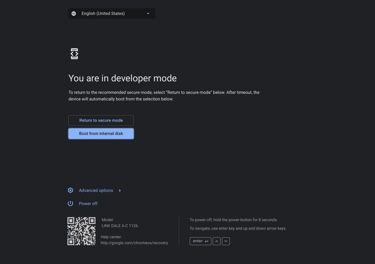
You can tell that you're in Developer Mode if you see one of these screens when you turn the device on:
Switch to Normal Mode
To restore your device to Normal Mode (i.e., disable Developer Mode), reboot your device and perform the following action:
- Device with keyboard: Press the
Spacebarat the firmware screen. - Devices without keyboard (tablet): Use the
Volume-UpandVolume-Downkeys to select theEnable OS Verificationoption. Press thePowerbutton to confirm.
NOTE: If you've made changes to the rootfs filesystem while in developer mode, you may have to use the recovery process to restore your device to its factory condition. However, as long as you don't crack open the case, you shouldn't be able to do anything that can't be undone by recovery (software).
Getting to a Command Prompt
If you're a Linux hacker, you probably know that Google ChromeOS is built on top of Linux and you're wondering how you can jailbreak your device so you can get to a command prompt. It turns out: there's no need. The command prompt is built in to your device!
NOTE: Before following these instructions, remember to put your device into Developer Mode.
Get the Command Prompt Through VT-2
One way to get the login prompt is through something called VT-2, or "virtual
terminal 2". If you're a Linux user, this is probably familiar. You can get to
VT-2 by pressing:
[ Ctrl ] [ Alt ] [ → ]
where the [ → ] key is the right-arrow key just above the number 3 on your
keyboard. If your keyboard does not have this key, instead use the key in the
F2 position which may be the refresh key or another key.
Once you have the login prompt, you should see a set of instructions telling you
about command-line access. By default, you can login as the chronos user with
no password. This includes the ability to do password-less sudo. The
instructions on the screen will tell you how you can set a password. They also
tell you how to disable screen dimming.
In order to get back to the browser press:
[ Ctrl ] [ Alt ] [ ← ]
where the [ ← ] key is the left-arrow key just above the number 1 on your
keyboard.
NOTE: The top-rows of the keyboard on a ChromeOS device are actually treated by
Linux as the keys F1 through F10. Thus, the [ → ] key is actually F2
and the [ ← ] key is actually F1.
NOTE: Kernel messages show up on VT-8.
Getting the Command Prompt Through "crosh"
An alternate way to get to a terminal prompt is to use [crosh]:
- Go through the standard ChromeOS login screen (you'll need to setup a network, etc) and get to the web browser. It's OK if you login as guest.
- Press
[ Ctrl ] [ Alt ] [ T ]to get the [crosh] shell. - Use the shell command to get the shell prompt. NOTE: even if you set a password for the chronos user, you won't need it here (though you still need it for sudo access)
NOTE: Entering the shell this way doesn't give you all the instructions that
VT-2 does (like how to set your password). You might want to follow the
VT-2 steps once just to get the instructions.
If you want to get back to the browser without killing the shell, you can use [ Alt ] [ Tab ].
NOTE: You can create as many shells as you want with [ Ctrl ] [ Alt ] [ T ]
again and another shell will be opened. You can [ Alt ] [ Tab ] between them.
Making Changes to the Filesystem
The ChromiumOS rootfs is mounted read-only. In developer mode you can disable the rootfs verification, enabling it to be modified.
*** note NOTE: If you mount the root filesystem in writeable mode, even if you make no changes, it will no longer be verifiable and you'll have to use a recovery image to restore your system when you switch back to normal mode. Auto updates may also fail until a full payload is downloaded.
To make your rootfs writable, run the following command from a shell on the device:
(dut) $ sudo /usr/share/vboot/bin/make_dev_ssd.sh --remove_rootfs_verification
You may be prompted to run this command again with a --partitions parameter. Use the partition number recommended in the error message.
If you are using a self-built or test image instead of a signed image, you may also need to remount:
mount -o remount,rw /
Then reboot. Your rootfs will be mounted read/write.
Specifying Command Line Flags for Chrome
-
Modify
/etc/chrome_dev.conf(read the comments in the file for more details). Be sure to use sudo while opening your editor, e.g.:$ sudo vi /etc/chrome_dev.conf -
Restart the UI with:
$ sudo restart ui
Booting from USB or SD card
ChromiumOS can be installed on a USB stick or SD card, for example if you
build it yourself. In order to boot these, you have to
first enable booting from external storage by opening a shell and
running the command crossystem dev_boot_usb=1. (Even though this only says
USB, it will also work for SD cards.)
Afterwards, reboot the device and use the method appropriate for your device to trigger external storage boot when you see the developer mode boot screen.
Running an alternative bootloader ("legacy BIOS")
You can install an alternative bootloader that may make it easier to boot other operating systems. This does not require you to disable firmware write protection (with its associated risks).
*** note NOTE: Some ChromeOS devices may ship with one or more alternative bootloaders pre-installed. These are merely provided as examples of how to set up the alternative bootloader feature. They are not officially supported, usually not tested and may or may not work at all or do anything useful. The point of the alternative bootloader feature is just to allow users to install their own -- we may occasionally pre-install software if it is readily available, but we are not committing to test and maintain it or to provide the same set across all platforms.
You can also find ready-made alternative bootloaders to install on third-party community sites such as mrchromebox.tech. Note that these sites are not affiliated with Google or the ChromiumOS project and we are not responsible for any issues or damages arising from them. Use at your own risk.
Alternative bootloaders must be packaged as a coreboot payload and installed in
the RW_LEGACY section of the firmware flash. You can read out the flash and
print the contents of this section by opening a shell and running
sudo -i
flashrom -r /tmp/bios.bin
cbfstool /tmp/bios.bin print -r RW_LEGACY
If you see a file called altfw/list in this output, you have a 2019+ platform
that supports having more than one alternative bootloader installed at the same
time. Otherwise, you can only install a single bootloader that must be called
payload. In that case you may need to remove an already installed bootloader
via cbfstool /tmp/bios.bin remove -r RW_LEGACY -n payload to make room.
*** aside
On some older devices, you may see the message E: Selected image region is not a valid CBFS, or you may see output with neither an altfw/list nor a
cbfs master header entry. In this case, you need to first initialize the
RW_LEGACY region by following the instructions under point 2. Create an
old-style CBFS in RW_LEGACY in this email. On
very old devices, you may see the message E: Image is missing 'RW_LEGACY' region, which means that your device unfortunately does not support the
alternative bootloader feature.
The new bootloader you want to add should be formatted as an ELF file. Make sure that the entry point information in the file is correctly set and that it contains code able to run in a firmware environment (i.e. no operating system support, nothing set up other than what coreboot usually provides to its payloads). Then add the file via
cbfstool /tmp/bios.bin add-payload -r RW_LEGACY -c lzma -n <your bootloader name> -f <path/to/your/bootloader.elf>
On an older platform make sure the name is payload and you're done. On a newer
platform, you can choose any name you want but you need to enter it in the
bootloader directory file. Extract this file with
cbfstool /tmp/bios.bin extract -r RW_LEGACY -n altfw/list -f /tmp/altfw.txt
and edit /tmp/altfw.txt with a normal text editor (e.g. nano). The file
contains one line per bootloader with the following values separated by
semicolons:
- Number of the bootloader in the developer mode menu (0 through 9)
- NOTE: The bootloader number 0 is always the "default" that will boot
if
dev_default_boot=legacyis set and the developer boot screen timer runs out.
- NOTE: The bootloader number 0 is always the "default" that will boot
if
- Name of the bootloader in CBFS (i.e. the
-nparameter tocbfstool) - Name of the bootloader that shall appear in the developer mode menu
- Comment field for more detailed description (not used by firmware)
Add a line for the bootloader you just added, save the file, then replace the file in CBFS with the updated version via
cbfstool /tmp/bios.bin remove -r RW_LEGACY -n altfw/list
cbfstool /tmp/bios.bin add -r RW_LEGACY -n altfw/list -f /tmp/altfw.txt -t raw
You may also want to delete the cros_allow_auto_update file, if present. This
will prevent future ChromeOS system updates from overwriting the alternative
bootloader section after you modified it:
cbfstool /tmp/bios.bin remove -r RW_LEGACY -n cros_allow_auto_update
Finally, you must write the modified CBFS section back to the firmware flash and tell the firmware to enable the alternative bootloader feature:
flashrom -w /tmp/bios.bin -i RW_LEGACY
crossystem dev_boot_legacy=1
Now you can reboot and use the method appropriate for your device to run your alternative bootloader when you see the developer mode boot screen.